Sunday, 1 September 2019

Vegan Chocolate Truffle

These chocolate truffles are oh so decadent and rich, not to mention super stunning. They are also vegan, paleo, healthy and dairy free. Whether you dip them in chocolate or roll them in cocoa powder or roll over chopped nuts, these chocolate truffles are fantastic vegan chocolate dessert or snack that you won't feel guilty about at all.


Ingredients:
  • 250g dark chocolate, chopped
  • 125g coconut cream
  • 1 tbsp melted coconut oil
  • 1-2 tbsp icing sugar (optional if you want the truffles to be slightly sweeter)
  • chopped hazelnuts, cocoa powder and melted dark chocolate for decorating the truffles
Method:

Place the chopped dark chocolate into a heat-proof bowl. Heat the coconut cream and coconut oil together until only just boiling (either on the stove or in the microwave), then pour it over the chocolate.

Allow to stand for 2-3 minutes, then stir well until you get a smooth glossy ganache. Taste the ganache-if you want it to be sweeter, then add some icing sugar.

Allow to cool first at room temperature, then in the fridge for about 30 minutes, until you can easily form truffles. Make truffles in different sizes if you want to decorate cake as it will make the cake decorations more interesting. Roll them in chopped hazelnuts or cocoa powder or dip them in melted chocolate. For a crunchy chocolate shell, mix some of the chopped hazelnuts into the melted chocolate.

Wednesday, 7 August 2019

Malaysian Pandan Chiffon Cake


Coconut milk and pandan (screwpine leaves) essence  are what make this cake deliciously aromatic and the secret to it is characteristic fluffy  texture comes from whipping the egg whites very well and not being too heavy handed when folding them in the end. As any chiffon cake, you must invert the pan immediately onto it's three "legs" once removed from the oven, so the sponge can stretch and retain it's airy volumn whilst cooling upside down. Don't worry the cake will stick and will not fall out !


Ingredients:
  • 6 eggs, separate
  • 170g & 90g sugar
  • 50ml vegetable oil
  • 100ml coconut milk
  • 1 tsp pandan essence
  • 150g plain flour
  • 2 tsp baking powder
  • 1 tsp salt
  • 1 tsp cream of tartar
Method:

Prepare a clean & and grease-free 23cm chiffon/angel food tube pan.

Preheat oven  to 180ºC/160ºC for fan oven.

In a grease-free and dry mixing bowl, beat the egg whites with an electric mixer or a stand mixer with sifted cream of tartar and salt until frothy. Then slowly add in the 170g sugar. Continue to beat until a thick white meringue with soft peaks forms. To test, you should be able to turn the entire bowl upside down without the meringue falling out. Set the bowl aside.

In another mixing bowl, add 6 egg yolks and remaining 90g sugar. Whisk until the eggs is pale and thickened. Add in the vegetable oil, coconut milk and pandan essence. Mix well.

Sift in the flour and the baking powder. Fold until combined.

Fold 1/3 of the meringue into the pandan batter. Mix until well combine. Then add in ½ of the meringue in the pandan batter. This time you need to slowly fold in with the batter until combine. Add the remaining meringue and fold until well combine. Do not over mix so that you don't loose the air from the meringue.

Bake in the preheated oven for 1 hour. Remove from oven and invert immediately upside down. Leave it to cool in this position and do not unmould cake until completely cold.

To remove, scrape all around the sides with a thin knife and let the cake slip out gently of the pan.Loosen the centre tube by running a knife around the tube. Scrape the bottom to remove the base/tube.

Cut the cake with a serrated knife. Enjoy with hot coffee or tea!


Friday, 2 August 2019

Rhubarb & Ginger Jam


This delicious jam is a perfect late winter pick-me -up combining seasonal forced rhubarb with health-boosting ginger.

Ingredients:
  • 1kg pink rhubarb, trimmed weight
  • 1kg jam sugar
  • zest & juice 1 lemon
  • 50g stem or crystallised ginger, finely chopped
  • 4cm piece ginger, peeled
Method:

Wash the rhubarb under cold running water and slice into 2cm pieces. Tip into a large ceramic or plastic bowl and add jam sugar, lemon zest and juice, chopped stem ginger. Finely grate the peeled ginger directly over the rhubarb.

Stir the mixture thoroughly, cover loosely with cling film and leave to one side for about 2 hours to allow the sugar to dissolve into the rhubarb juices. You may need to stir the mixture occasionally to encourage this process along.

Pop a fw saucers in the freezer. Scoop the fruit al all the sugary juices into a preserving pan and set over a medium heat. Stir until the sugar has completely dissolved, and bring to the boil. Continue to cook at a fairly swift pace until the rhubarb is really tender and the conserve has reached setting point-this should take about 10-15 minutes.

To test for a set, drop ½ tsp of the jam onto a cold saucer, leave it for 30 seconds, then gently push it with the tip of your finger, if the jam wrinkles the setting point has been reached. If not, continue to cook for a further couple of minutes and test again.

Remove the pan from the heat and leave to one side for 2-3 minutes before pouring into a sterilised jars. Seal immediately and label with the date once completely cold.


Thursday, 1 August 2019

Chickpea Vegan Meatloaf


This hearty vegan meatloaf is made from a base of seasoned chickpeas, baked up to a perfection and topped with flavorful maple glaze. It is not quiet a classic meatloaf. It's better !!!


Ingredients: 
  • 3½ cups cooked chickpeas, drained and rinsed
  • 1 onions, diced
  • 2 celery stalks, chopped
  • 2 carrots, diced
  • 2 garlic cloves, diced
  • 2 cups panko breadcrumbs
  • ½ cup soy or almond milk
  • 3 tbsp vegan Worcester sauce
  • 2 tbsp light soy sauce
  • 2 tbsp olive oil
  • 2 tbsp ground flax ground seeds
  • 2 tbsp tomato paste
  • 1 tsp liquid smoke, optional
  • ¼ tsp black pepper
For Maple Glaze:
  • ¼ cup tomato paste
  • 2 tbsp maple syrup
  • 2 tbsp apple cider vinegar
  • 1 tbsp light soy sauce
  • 1 tsp smoked paprika if not using liquid smoke or paprika if using liquid smoke
Method:

Preheat oven to 190ºC/170ºC for fan oven. Lightly oil a 9 inch loaf pan and arrange a strip of baking paper width-wise along the center, with just a bit hanging over the sides.

Working in batches if needed, place all meatloaf ingredients into food processor bowl and pulse until chickpeas are broken up and ingredients are well mixed, stopping to scrape down sides of bowl as needed. DO NOT OVER-BLEND. If working in batches, transfer each batch to a large mixing bowl when complete and then mix by hand.

Press mixture into prepared loaf pan and bake for 30 minutes.

While meatloaf bakes, stir glaze ingredients together in a small bowl.

Remove loaf from oven after 30 minutes and spoon glaze overtop of loaf. Bake another 20-25 minutes. Remove from oven and allow to cool at least 10 minutes before cutting.

Notes: The longer this sits, the firmer it gets. If it initially feels a bit soft for your liking, let it sit for a few minutes or prep it a day in advance and reheat the day serving


Pork & Shrimp Wonton with Nahm Jim Green Chilli Dipping Sauce


This the the chinese style wonton but I put a twist into it. I decided to make the dipping sauce using recipe from Marion Grasby. 
Usually wonton is served in a clear chicken soup or deep fried. I am serving this way for a dinner party.

Ingredients:
  • 80g raw shrimps, devined
  • 160g ground pork
  • 1 garlic
  • 1 tsp finelly minced or grated ginger
  • 2 tbsp thinly sliced spring onions
  • 1 tbsp light soy sauce
  • 2 tsp Shaoxing rice wine, or sweet sherry 
  • 1 tsp sesame oil
  • ½ tsp granulated sugar
  • ¼ tsp salt
  • a dash of white ground pepper
  • frozen/fresh wonton skin
Nahm Jim Green Chilli Dipping Sauce:
  • 2 garlic cloves
  • 1 small green chilli, remove the seed. Add more chilli if prefer spicy
  • 2 coriander roots
  • ½ tsp salt
  • 1½ tbsp sugar
  • 1 tbsp fish sauce
  • 2 tbsp lime juice
Crispy Garlic oil:
  • ¼ cup vegetable oil
  • 6 garlic cloves, roughly chopped
Method:

For wonton: Finely minced raw shrimp until they are almost the consistency of a paste. Mix the shrimp in a large bowl with the ground pork, garlic, ginger, spring onions, soy sauce, Shaoxing rice wine,sesame oil, sugar, salt and pepper. Combine using a fork or mixing chopsticks until the filling is fairly smooth and paste-like.

To fold the wonton, place a teaspoonful of filling onto a centre of each wonton wrapper as picture below


Using your finger or a pastry brush to dampen the top and right edges of the wrapper with water. Fold the bottom left corner over the filling to meet the top right corner, forming a triangle as the picture below. Press around the filling to remove any trapped air from the folded wonton.


To make the Nahm Jim dipping: Use a mortar and pestle to pound the garlic, chillies, corainder roots and salt to a fine paste. Stir through the sugar, fish sauce and lime juice. Transfer to a small bowl and set aside until ready to serve.

Simmer the wontons: When ready to serve, bring a large pot of water to a boil. Add the wontons to the pot in batches, gently stirring so they don't stick to the bottom and being sure not to crowd them (they need enough room to float) Simmer for 2-3 minutes, until the wrappers are transparent and the wontons float in the water. Drain and place on a serving plate. Drizzle with garlic oil.
Spoon over the Nahm Jim sauce and then scoop out some crispy garlic bits to sprinkle on top. 

Serve warm.

Celebration Chocolate Cake


Its a chocoholic dream. Bake this cake for my son 19th birthday and a close friend birthday. A 3 layer chocolate sponge filled with a rich chocolate ganache. It doesn't stop there! Coated with Matchstick and decorated with a smorgasbord of sweetie and chocolates favourites,  this cake would be a real treat to celebrate any occasion. 

Vegan Banoffee Cheesecake

A nutty biscuity oat and date base, the most creamy yet perfectly sliceable toffee cashew date cheesecake layer topped with lots of fresh banana slices and a generous drizzle of caramel sauce!


Ingredients:

Base:
  • 100g almonds
  • 75g oats
  • pinch of salt
  • 150g dates, pitted
  • 2 tbsp coconut oil, melted
  • 2 tbsp maple syrup
Caramel cheesecake layer:
  • 200g cashew nuts
  • 400g full fat coconut milk
  • 100g coconut oil, melted
  • 300g dates
  • 5 tbsp lemon juice
  • 1 tsp vanilla extract
  • pinch of salt
  • 2 ripe bananas
Caramel drizzle:
  • 100g dates
  • 125ml soy milk
  • 15g coconut oil, melted
  • 1 tsp vanilla extract
  • pinch of salt
Method:

Fot the base: Toast the almonds on a medium heat in a frying pan (no oil or fats) Then place the almonds, oats, salt, dates, coconut oil and maple syrup in a food processor or blender and pulse until you have a sticky crumbly mixture that holds together if you pinch it between your fingers.

Firmly press the mixture into a round loose bottom cake tin and pop it in the fridge.

For the caramel cheesecake layer: Either soak the cashew nuts for at least 3 hours or over night or cook them in water for 5 minutes until they soften.

Place the cashew nuts, coconut oil, coconut milk, dates, lemon juice, vanilla extract and salt in the blender or food processor and blend until smooth and creamy. Depending on your blender you might have to scarp down the sides and stir the mixture a few times.

Pour the cheesecake mixture on top of the cake base and pop it back in the fridge and let the cake set overnight.

When the cheesecake has firmed up, make the caramel drizzle by adding the dates, soy milk, coconut oil, vanilla extract and salt to a blender and blitz until smooth and creamy.

Cut the bananas into slices and top the cake with the banana slices and generous drizzle of the caramel sauce. You can transfer the caramel sauce to a pipping bag or use a spoon.

Enjoy!!!


Sunday, 28 July 2019

Blackberry Cheesecake Brownies


Blackberry cheesecake brownies that will have everyone begging for second. A rich brownie base, tangy cheesecake and sweet blackberry swirl!!!

Ingredients:

For the brownies:
  • ¾ cup cocoa powder
  • 1½ cups sugar
  • 2 eggs
  • 170g butter
  • ½ cup plain flour
  • 2 tsp vanilla extract
  • ½ tsp salt
For the Blackberry puree
  • 180g fresh/frozen blackberry
  • ¼ cup granulated sugar
  • ¼ cup water

For the cheesecake:
  • 225g cream cheese, softened
  • ¼ cup greek yogurt
  • 1 large eggs
  • ¼ cup sugar
  • ½ tsp salt
Method:

Blackberry puree: Cook blacberry puree by combining all the ingredients in a small saucepan over medium-high heat for about 10 minutes.  Using a whisk or spoon to help break down the blackberries. Once cooked, place a fine mesh strainer over a small bowl and using a spatula, squeeze through all the liquid and dispose if the solids. Let cool to room temperature.

Pre-heat oven to 160ºC. Line an 8"x8" baking dish with parchment paper and set aside.

Melt butter in a saucepan or in microwave. Stir in sugar, eggs, vanilla extract and salt. Once combined, fold in cocoa powder and flour.

Pour the brownie batter into a baking dish, spreading evenly to the edges. Combine all the cheesecake ingredients in a standing mixer fitted with a whisk attachment. Cream for 2-3 minutes on medium high speed.

Pour over the brownie batter, spreading evenly to the edges. Drizzle the blackberry puree on top of the cheesecake in dollops and swirl using a fork, knife or toothpick. Try ro swirl only into the cheesecake batter, not the brownie batter.

Bake for 50-60 minutes or until the cheesecake begins to turn golden and a toothpick inserted in the center of the brownies comes out mostly clean.

Place in the fridge and allow to cool for at least 2 hours but up to overnight. Cut into 9 squares.


Saturday, 29 June 2019

Mushroom Wellington

This tasty vegan Portobello Mushroom Wellington is perfect main for Christmas dinner!!!


Ingredients: 

  • 4 portobello mushrooms
  • 4 cloves garlic, minced
  • 1 tbsp fresh thyme (leaves part)
  • 1 tbsp fresh  rosemary, finely chopped
  • 1 tbsp olive oil
  • sprinkle of salt and pepper
Nut Roast:
  • 1 large red onion, finely chopped
  • 1 tbsp fresh rosemary, finely chopped
  • sprinkle of salt and pepper
  • 1 cup white wine
  • ½ tbsp brown sugar
  • 2 cups chestnuts
  • 2 cups pecan
  • 2 slices seeded bread
  • ½ cup vegetable stock
Wellington Case:
  • 2 block short crust pastry
  • ½ cup soy milk, for brushing and sticking

Method:

Put the portobello mushrooms in a baking tray and cover in a splash of olive oil.

Sprinkle the rosemary, thyme, salt, pepper and garlic over the top of the mushrooms.

Bake at 200°C for 15  minutes and once they are ready, set to one side to cool.

Put the red onion in a pan with olive oil and fry until it is translucent.

Add the rosemary, thyme, salt, pepper and cook them together until they are sticking. Add a cup of white wine and cook the alcohol off.

Add some brown sugar and mix it round so it caramelises, pour the mixture in a glass mixing bowl.

Put the chestnuts, pecans and bread in a food processor and whiz them all up into crumbs. Add the crumbly mixture into the glass bowl with the onions and gradually pour in the vegetable stock.

Stir the mixture round with a wooden spoon so it clumps up. Spread 1cm thick layer of the mixture onto a sheet of shortcrust pastry (laid out on a baking tray)

Mould the mixture with your hands into a large, thin, wide sausage shape.

Put the pre-cooked portobello mushrooms on top of the sausage.

Encase the mushrooms in the rest of the nutty mixture and smooth it out with your hands.  Carefully lay the second sheet of the shortcrust pastry over the top of the roast mould.

Push the pastry down with your fingers. Cut off the edges of the pastry with a pizza cutter or a sharp knife.  Remove the excess. Cut the excess into shapes to decorate the wellington.

Seal the edges with fork, take care here, make it look good.

Decorate your wellington with shapes you cut out of the excess pastry and fork in air holes.

Bake fir 200°C for 40 minutes, check after 30 minutes. f it looks ready, take it out from the oven.

Use a bread knife to carve the wellington into slices.

Serve with all the trimmings.


Friday, 14 June 2019

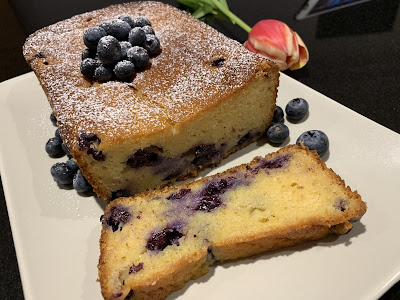
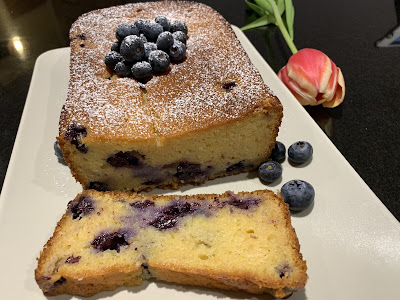
Blueberry Cake with Honey and Lemon


This delicious blueberry, honey and lemon cake is a proper teatime treat that is really simple to make. When it's fully cooked, it will have a crisp dark brown exterior which looks even  more appetising with a light dusting of icing sugar and a handful of fresh blueberries. It is best enjoyed fresh out the oven with a steaming pot of tea or coffee and a good company.


Ingredients:
  • 150g butter, melted
  • 175g castor sugar
  • 50g honey
  • 150g greek yogurt
  • zest of 1 lemon
  • 1 tbsp vanilla extract
  • 225g self raising flour
  • 2 eggs
  • 125g blueberries, plus extra to serve
Method:

Heat the oven to 150°C fab oven. Line a 25 x 12 cm loaf tin.

Whisk together the butter, sugar, honey, eggs and yogurt with the lemon and vanilla.

Fold in the flour and blueberries.

Spoon into the lined tin, level the surface and bake for 1 hour until cooked through. Test with a skewer and should come out clean. Serve with dusting of icing sugar and extra blueberries.


Baby shower cupcakes

These cute baby shower cupcakes are easy to make.  Celebrate with family and friends with these delightful little crowd pleasers! Can use any type of cupcakes for this.
The baby name has been picked and you have got the perfect gift to give to the mom-to-be at the baby shower. The party games are ready to go, so now it's time to consider one of the most important parts of any party: the cake, of course!


Thursday, 13 June 2019

Steamed Bao Buns

These Asian Steamed Buns /bread will wow your friends and family. Also known as Bao, these buns are a blank canvas for whatever you'd like to fill them with.....preferably something savoury, sweet and spicy all at the same time.


Ingredients: 
  • 2½ cups plain flour (use bleached flour if you want a complete white bubs)
  • 1/3 cup (84ml) warm water
  • ½ cup (125ml) warm milk
  • 1 tbsp active dried yeast
  • 4 tbsp sugar, divided half
  • 2 tbsp sunflower oil
  • ½tsp baking powder
  • ¼ tsp salt
Method:

Combine warm water, milk, active yeast, sugar and oil. Whisk to let the yeast and sugar dissolve then let it sit until yeast activate, about 5-10 minutes.

Meanwhile, combine flour, sugar, baking powder and salt in a stand mixer. You can mix this with your hand if you prefer.

Pour the wet ingredients to dry ingredients mixture. Start on a low speed to slowly incorporate all the ingredients together then on medium speed until it becomes dough shape. Keep kneed for 3-4 minutes on medium speed. The dough should be elastic and really soft but not stick to your fingers or on the mixing bowl.

Take the dough out from the hook and form a ball. Place back to the mixing bowl, cover with cling film and let it rise in a warm place until it becomes triple in size, about 2 hours. Let it sit longer if needed.

Place the raised dough on a working surface. Roll out the dough ¼ inch thick. Sprinkle flour is not necessary but if you do, use as minimal as possible. Cut the dough 3½ to 4 inch circle with a round cutter. This recipe makes about 13-16 baos.

                                                     
Lightly brush or spray oil on one surface of the baos and fold in half and place a piece of baking paper in the centre.


Gently press each bao with a roller and place on a baking paper. Cover with a lid and let it rest for additional 30-40 minutes.

Meanwhile, bring water to a boil on wok or a steamer pot. Carefully place the steamer with the baos on top of the boiling water wok/pot. Make sure water is not touching the baos. Cover and steam for 8-12 minutes. When they are done cooking, tilt the lid a little for a slow air circulation about 2-3 minutes before opening the lid.

Prise open each bun and fill with pulled pork or pull jackfruit or any filling you fancy.

You can serve the baos as a side or make sandwiches!
Enjoy!


Sunday, 5 May 2019

Heart Cheesecake

This Valentine's tell your sweethearts how you feel by adding personalised messages on brightly coloured, rich and creamy, Heart Cheesecakes. This fun twist on a holiday classic is sure to win the hearts of your loved ones. 

Each sweet little dessert was brightly coloured and personalised with a special message printed on top just like the candy conversation hearts


Ingredients:
  • 10-12 digestive biscuits, finely blitz
  • a pinch of cinnamon powder
  • 25g butter, melted
  • 450g cream cheese, room temperature
  • 1 cup sugar
  • 3 large eggs
  • 500ml sour cream
  • 1 tsp vanilla extract
  • some food colouring, blue, red, purple, green pink, yellow
Method:

Fill a roasting pan with enough water to come half way up the sides of the silicone heart moulds. Set the pan in oven.

Heat oven to 160°C/140°C for fan assist oven.

Mix together the biscuits crumbs, cinnamon and melted butter. Divide equally the crumbs among the 18 hearts shape silicone mould. Press the crumbs into an even layer and refrigerated until needed.

Beat cream cheese until creamy and smooth. Add sugar and beat until incorporated. 

Beat in the eggs and then sour cream and vanilla and mix just to combine. 

Equally divide the batter into 6 bowls. Colour one bowl of filling pink, another yellow, purple, green, orange and blue using food colouring.

Equally divide each colour of filling among 3 heart cavities. 

Bake cheesecake in a water bath for 18-24 minutes until the edge look set but the centre is jiggly but not wet.

Remove from oven and water bath and allow to cool at room temperature for an hour. 

Freeze for at least 2 hours the remove and un-mould.

Paint conversation heart phrases onto the tops of the cheesecakes using red food colouring


Vegan Garlic & Herbs Cheese


Making a vegan cheese has never been so easy. This garlic and herbs cheese is delicious, dairy free and has no added oil. Is made of cashew nuts, agar agar powder, nutritional yeast and spices. Serve on bagels, chips, crackers or celery. Enjoy! 


Ingredients:
  • 60g cashew nuts
  • 1 tsp basil
  • 1 tsp oregano
  • ½ tsp salt
  • 1½ tsp cornflour
  • ½ of 1 garlic clove
  • 3 tbsp nutritional yeast
  • 1 tbsp lemon juice or cider vinegar
  • 1 tsp maple syrup
  • 1 cup water, divided
  • 1½ tsp agar agar powder
  • oil to brush the ramekin
Method:

Soak the cashew nuts  1 hour in hot water.

Drain the cashew nuts and place them in a blender along with the basil, oregano, garlic, salt, cornflour, nutritional yeast, lemon juice, maple syrup and ½ cup water. Process for 2-3 minute and set aside.

In a saucepan combine ½ cup water and agar agar powder. Add the cashew nut mixture and bring to a boil, stirring constantly.

Pour into the lightly oiled ramekin and refrigerate at least 2 hours. Remove by turning upside down onto a board.


Bacon-Wrapped Pork Tenderloin


Nothing beats the scent of rosemary and roasted bacon from the oven, it's maybe the best recipes for pork you will ever have!. To enhance the recipe, you can add more flavouring by letting the tenderloin marinate overnight. Serve this gourmet dish for a dinner main course and just watch the smiles on the faces of your guests! This serve 4


Ingredients: 
  • 600g pork tenderloin
  • 100g thin sliced bacon
  • 2 onions
  • 2 cloves garlic
  • ½ cup chicken stock
  • rosemary
  • ground pepper and olive oil
Method:

Preheat oven  to 180°C/160°C for fan assist oven.

Prepare the pork tenderloin, wrap it with bacon slices and tie up with a string, along with rosemary sprigs.

Put the roast in a rectangular baking dish. Add the onions, garlic, chicken stock and a little olive oil.

Lightly ground pepper over the wrapped tenderloin and roast for 40-50 minutes depending on the size.

Remove the string before serving. Cut the tenderloin and serve with the gravy and side dish of your choice-roasted potatoes, green beans, carrot, broccoli....