Showing posts with label Bread. Show all posts

Sunday, 5 May 2024

Sourdough Farmhouse Sandwich Loaf


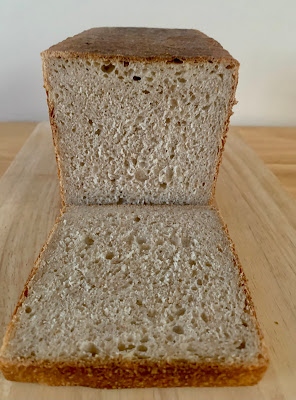
Soft and fluffy sourdough bread is the perfect bread to have on hand. Made with white and wholemeal bread flour, active sourdough starter, butter and a little sugar, this fermented bread has a lighter texture and tangy flavour.
Not only this recipe absolutely delicious ( making it really hard to ever go back to store-bough bread), but it is also super simple. No strange ingredients, no stretching and folding every 30 minutes.....Just mix, rise, shape, rise again and bake!!!
Let it cool, slice and slather it with butter. It is so yummy and it reminds me of a bread you would get on a breadboard from a restaurant.
Let's be honest, though, it is wat better since it's made from scratch and has that wonderful sourdough tang. 


Ingredients:
  • 270g warm water
  • 85g warm milk, can substitute with plant-base milk
  • 45g sugar
  • 120g active sourdough starter
  • 50g butter, melted and cooled, can substitute with plant-base butter
  • 400g white bread flour
  • 200g wholemeal bread flour
  • 12g salt
Method:

Premix and autolyse: Add the milk, water and sugar in a large mixing bowl and stir until the sugar dissolved.  

Now add the sourdough starter to the liquid ingredients and stir to dissolve it a little.

Now add the rest of the ingredients; bread flours, salt and melted butter. Mix them together until a shaggy dough forms. Cover with a shower cap or a tea towel and let it sit for an hour.

Kneading the dough: You can knead this by hand or a stand  mixer. If kneading by hand, knead the dough for 10 minutes or until it is soft and elastic. The dough should feel slightly sticky but not be a big mess.
If using stand mixer, which is my favourite. You need to use the dough hook. Knead for 2-3 minutes, then give the mixer a rest for 2 minutes. Repeat this process in total 3 times. The dough should come away from the side of the bowl when it is done.

Bulk ferment: Once the dough is kneaded sufficiently, you need to bulk ferment the dough. If you are using a stand mixer, it is fine to leave it in the mixing bowl. At this point you can just leave the dough as it is, covering it with shower cap or tea towel to stop it drying out. 

As with any sourdough bread, the bulk ferment time depend on the temperature in your kitchen and of course the strength of your starter.  You are  looking for your dough to be just UNDER double.

Shaping: Once the dough has finished its bulk ferment you can shape your dough. Before you start shaping, lightly butter or oil the loaf pan.

ease the dough out the bowl using a silicone dough scraper, remembering to have the smooth side on the counter and the sticky side facing up. You shouldn't need any flour for this as your dough shouldn't stick.

Gently ease your dough out into a rough rectangle, with the shortest side in front of you.

Pop any large bubbles and gently flatten the dough using your fingertips.

Then roll the dough up into a log and tuck the ends under. Leave the dough to sit and relax for around 30 minutes.

After 30 minutes. tighten up the log by pulling the dough a little, using the sticky underside to create tension. Then simply plop the log into your oiled tin.

Second rise: Once the bread has been shaped and is in the tin, you will need to let it rise again so that it fills up the shape of the tin.

This should only takes a few hours but like bulk ferment, this will depends on the strength of your starter and the temperature  of your kitchen.

You will know it is done when it's risen above the lip of the tin (if you are using an open tin) It will be rounded on the top. When you poke it, it will leave a slight indent but spring back nice and slowly.

If you shaped it quite tight, you will see some tension on top of the dough as it's risen.

Baking: Preheat the oven around 180ºC. Let the oven warm for around 1o minutes and then place the sandwich loaf tin in the oven and bake for approximately 40 minutes or until the top is golden brown.

Once the dough is baked, remove it from the tin and leave to cool on a wire rack. Brush the top with some melted butter for a richer flavoured and soft crust.

Ideally, leave it for at least 90 minutes before you cut into it.

Enjoy!!!


Monday, 13 November 2023

Longevity Peach Buns (ShouTao Bao 寿桃包)


A soft fluffy basic steamed bun is shaped into a peach shape and can be filled with a sweet filling of your choice is popular in the Chinese culture to represent longevity.

Shou means longevity and tao means peach. Why peach? It was back in the ancient times when the immortals have been given peaches that promise longevity. It was called peaches of immortality and to this date, the peach has been used as the symbol of longevity. So it is not uncommon to see fresh peaches or longevity peach steamed buns are gifted as birthday presents in the Chinese culture.


Ingredients:

For the bun dough:
  • 300g plain flour
  • 30g castor sugar
  • 1 tsp instant yeast
  • 170ml cold milk/water
  • 8g vegetable oil
Colouring:
  • tea strainer
  • toothbrush
  • 2 tsp water+ 2 drops pink colouring, for the buns
  • green food colouring, for the leaves.
For the filling:
  • 360g red bean paste, black sesame paste or any filling you like. You can buy ready made filling from Oriental shop or you can make the filling yourself.  Divide in 30g each ball. 
Method:

For the filling: It will be easier to handle the filling when it is chill. Roll into a balls of about 30g each balls. I place them in the freezer while making the bun dough.

For the bao bun: In a large bowl, mix in the cold milk along with instant yeast and sugar. Stir well until the sugar is completely dissolved.

Add in the flour and mix everything together, gather all small crumbs until it creates a dough ball. 

Pour in the vegetable oil. It seems too much oil at first, collect all the oil in the bowl, and then continue kneading on a work surface for about 1 minutes. When you feel that the oil started to absorb completely, roll the dough into a long shape (like sausage). Then take left and right ends and fold it to the centre of the dough (repeat the same process for 2 times). The dough gradually will become really smooth. Do not overwork, this kneading process will only takes about 3-4 minutes.

Once the dough is ready, you can use it immediately. There is no need to rest the dough because by proofing it twice, it will cause a lot of air bubbles on the surface.

To fill & shape: Reserve 40g of the dough for the peach leaves and divide the rest into 12 equal pieces (about 45g to 48g each). Always cover the bun with a cling film to prevent from drying out.

Take 1 portions of the dough, press into a thick disk. Using a rolling pin, roll back and forth onto rectangular shape, fold into 2 equal shape pieces, turn 90º angle and repeat the same process 2 times. 


Then roll the dough into a square shape, grab the dough with left hand and rolling pin on the other hand. Using the rolling pin, roll up and back flatten the edges of the dough while turn the dough a little by little (middle part should be slightly thick).

Place 1 portion of the red bean paste filling to the centre of the dough, gather the sides to enclose the bun and pinch to seal.

To shape the bun into peaches, flip the filled bun so the seam side is down and shape it to a smooth oval ball. Using your palms, form a peak on the top. To make the seam of the peach, gently press the bench scrapper in to create a line along the arch; pinch the top, mimicking the shape of the peach.

Cover the filled buns with a cling film and repeat this process with the rest of the dough and fillings.


For the bun leaves:
Colour the 40g left over dough with green food colouring and divide it into 24 equal pieces. (about 2g each). Using bend scraper, flatten the cone. Form a line in the centre and create the leaf vein patterns tilts towards the cone.

Colour & decorate the bun: To create the pink shades of the buns, simply mix some water with a few drops of pink food colouring.  Dip the toothbrush to the colouring mixture, tap off any excess onto a kitchen paper.

Hold the strainer upside down 2-3cm above the bun, the gently brush the toothbrush over the back of the strainer in a circular motion; repeat the same process until you get the desire colour shades.


Attached the leaves onto each peach bun with a ab of water, a pair for each bun. Place each bun onto a piece of baking paper.


Proof & Steam: Place the finished bun in the steamer; make sure you give some space in between the buns so they won't stick one another after fermentation or steaming. Cover and allow to rise for about 30 minutes to an hour depending on the temperature in the house.

After fermentation, the proofed buns should feel lighter and rise about 50% of their original size. If you gently press it with your finger, the dough will make a indentation and be able to slowly bounce back into shape.

Over medium high heat, steam the buns for 10-15 minutes. After 10 minutes, take the streamer off from the heat, DO NOT OPEN the lid and let it sit for another 5 minutes. If you open the lid immediately, the skin of the bun will get wrinkly.

Serve !

Friday, 19 May 2023

Sourdough Roti/Phulka


This is a simple traditional Indian flat bread with a touch of sourdough starter. Amazingly it is only made with only 4 ingredients!!
What is the difference between chapati and phulka? Chapati is made on a tawa only and roasted with oil or ghee. Whereas phulka are partially cooked on the tawa and pater puffed on direct flame. Also chapati is usually larger in size than a phulka. 

Ingredients:
  • 260g whole wheat flour, extra for rolling
  • 50g sourdough starter
  • ½ tsp salt
  • ¾ cup water
Method:

In a bowl add the whole wheat flour, salt, sourdough starter and water. Combine well to form a dough.

Set aside for 15-20 minutes.

Divide the dough into 12 equal pieces and roll them into round ball. Roll the dough into the extra flour that you keep aside for rolling.

Using a roller, spread the dough into 6 inch thin round. Make sure to spread thin, with a thickness of a credit card or ½ inch. Also dust off the extra flour, so that you will not see any burnt flour in the griddle.

Once you spread half of the dough, heat a griddle or tawa. When you sprinkle water, it will sizzle, that is the sign that your gridle is ready.

Carefully place the spread disc and cook for 30 seconds or until you have blister or bubbles on the top, flip and cook the other side too for another 1-2 minutes or until you see brown spots.

Place directly into the flame, phulka will puffed up.

Remove from the fire and transfer to a tortilla container (if you have one). Close the lid immediately. This will make steam to trap inside and make a soft phulka.

Serve with phulka with side dishes. You can store the sourdough phulka at room temperature for one day and reheat in microwave for 15 seconds before serving.

Sunday, 29 January 2023

Bunny Red Bean Bao Buns


To usher the Year of the Rabbit, I decided to make my bao buns in the shape of a bunny! Bunny Bao Buns!! These vegan bunny-shaped boa buns are ridiculously fluffy, soft, shinny and sooooooo cute.


The dough can be all be mixed into one bowl which is the best. And great news is no hand muscles needed to make this delicious bao buns, all just mix in a cake mixer. 
If you want to make a plain boa buns, you can go ahead and divide and shape the dough into a ball, let it rest and then steam. However, if you want to make a bunny shaped like this, have pink and black good colouring on hand!
You only need a little dough for the pink and black details. I then divided the remaining dough for 30g each balls. Once I had all my dough separated out, I lightly covered them with a tea towel to avoid them from drying out while I shaped each bunny.
You can make it a plain buns. I like mine filled with shop bough red beans paste. You can find the paste in any Asian shop.

 For the ingredients and method on how to make the buns but not shaping, following the link below:


To assemble the bunny:

To make the bunny ear and eyes, once the dough is all ready mixed, pinch about 25g for the plain dough and add the pink colouring to the dough and mix well. 

Again take about 10g of another plain dough and add the black colouring and mix well. Set aside separately both the pink and black dough and cover with a cling film to avoid dryness.

Put the packet of the red bean paste in freezer for about 4 hours. This will make the paste much easier to handle. Then take about 15g to 20g and shape them into balls. You can also freeze the red bean balls for easy handling.

You should get about 14-15 plain dough balls. Flatten and shaped the balls into circles, with the outer edge thinner than the centre.

Place the red bean ball in the centre and encase the filling with the dough. Press and seal the dough well. Slightly elongate the bun into an oval-egg shape. Place seam-side down into a piece of baking paper.

Create a pea-sized pink ball, about 14-15 pink balls for the tail, another pea-sized of 14-15 pink dough for the ears (divide the dough into 2 to make a pair of ear) and a buckwheat-sized black dough balls for the pair of eyes. Adhere all pieces with a touch of water.

Allow to rise, covered, for 30 minutes.

Steam in a bamboo steamer for 10 minutes, and serve immediately.

Any leftovers can be stored in the fridge for 5 days, or frozen for 2 months.

Wednesday, 28 December 2022

Turmeric Sourdough Bread


We all know how important turmeric is for our health. So what can be better than a turmeric loaf made with some sourdough starter and love. This is a simple sourdough bread and all you need to have are time and patience. It takes around a day to make (depends on the climate in your country) but it is worth it, especially since you don't need to be hands on the entire time. Just a little time here and there and you have a lovely homemade loaf ready to eat.


Ingredients:
  • 270g bread flour
  • 30g whole wheat flour
  • 207g water
  • 21g cold water added along with salt
  • 6g turmeric powder
  • 60g levain
  • 6g salt
Method:

Mix water with flour and turmeric powder, cover, let it rest 1 hour for autolyse. During the autolyse process flour absorbs water, becoming fully hydrated. This activates gluten development.

After an hour, add sourdough starter. Mix on low speed of your mixing machine for 2-3 minutes. You can also use your hand to mix the dough. Cover, let it rest for 30 minutes.

After 30 minutes up, add salt and extra water. The process of adding extra water is called bassinage, it helps to tighten up gluten. Mix on low speed of your mixing machine for 2-3 minutes, or mix well with your hand. The dough should come up together, but still be sticky on the bottom.

Continue gluten development and structure building by performing stretches and folds during the warm fermentation period. Leave to rest 30 minutes.

Spray your worktop with water, wet your hands to perform lamination. Lamination is the process of stretching the dough as thin as you can without ripping it. Spread the pumpkin seeds all over the dough, fold and let it rest for 45 minutes.

Perform 3 stretches and folds every 45 minutes. Performing stretches and folds will help with gluten development. Keep monitoring the dough, if it rises too fast, you can shorten the time between stretches to 40 minutes or less.

After the final stretch, let the dough proof for 30 minutes. You should see some bubbles on the surface, the dough has to become lighter. We are looking for 40%-5-% rise.

After 30 minutes of proofing, transfer the dough onto a worktop and dust the worktop with flour. Flip the dough over so the floured side faces down. Fold the dough onto itself so the flour on the surface remains entirely on the outside of the loaf. This will become the crust.

Place the dough round on a worktop and let it rest for 30 minutes uncovered.

Dust the dough with flour. Use a dough scraper to flip it over on to a worktop so the floured sides face down.  Starting with the side closest to you, pull the right 2 corners of the dough to the left, then fold them up into half of the dough. Repeat this action with the other sides too.

Finally, roll the dough. Shape it into a smooth, taut roll. Transfer the roll, seam side up, to a prepared proofing basket.

Cover it with plastic and let the dough rest for 15 minutes. Then transfer the dough to rise for 14-24 hours in the refrigerator.

Preheat your oven to 220ºC, place the dutch oven with lid inside for 20 minutes. Remove the dough from the fridge.

Flip it over on a baking paper, score it with a sharp knife or blade or a scoring lame. Transfer on to the dutch oven, cover with lid and bake for 15 minutes. Remove the lid  and reduce the oven temperature to 200ºC. Bake for 20 minutes until golden brown.

Enjoy!

Monday, 19 September 2022

Cinnamon Raisins Sourdough Bread


This cinnamon and raisins sourdough bread is absolutely incredible for breakfast, toasted up with butter or peanut butter! This cinnamon and raisins sourdough bread is easy to make even if you are a beginner. 

You might be saying to yourself "I can't make sourdough"-perhaps the whole process intimidates you. While it certainly is a multi-day endeavour, rest assured that sourdough id easy to make at home once you understand the basics.

Ingredients:
  • 100g active levain
  • 500g flour, I use 60% white flour and 40% whole grain flour. 
  • 9g salt
  • 350g water
  • 100g raisins
  • 8g ground cinnamon
Method:

Once your levain is ready, combine 100g of the levain with 350g of water. Add the flour to the water mixture and using your hands, mix to combine.

Once the dough is mixed, cover with tea towel or shower cap and let it rest at room temperature for 40 minutes to rest. Meanwhile, soak the raisins in room temperature water, making sure the raisins are covered with water.

After the elapsed 40 minutes resting time, add the salt. Mix well until combined. Drain the raisins and mix them into the dough along with the cinnamon.

DO THE FIRST FOLD:  To do this, get your hands damp and reach under the dough on the opposite side of the bowl from you. Pull the dough up and over towards you.
Repeat this so the side closest to you folds over to the side away from you and the side on your left folds towards your right, and your right folds towards your left. This is called the envelope fold or think of as wrapping a package.

Then scope your hands under the ball of dough and flip it over completely. This completes one "fold".
Complete 6 more folds, one fold every 30 minutes for 3 hours in total.

SHAPING THE DOUGH: Begin by taking the dough out of the bowl and letting it rest on the counter for 20 minutes. 
Meanwhile, prepare the banneton by dusting it with flour, or layer a clean tea towel in a medium mixing bowl and dust liberally with flour.
Shape your dough making sure you get as much surface tensions as possible without tearing the outside of the loaf.
Once shaped, turn the loaf into the lined and floured bowl or banneton, top down, seam side up.
Gently flour the top before covering the edges of the tea towel. Set in the fridge overnight.

BAKE DAY: The next day place your dutch oven in the oven and preheat to 240ºC/220ºC for fan assist oven. After the oven has come to temperature, take the bread out of the fridge.
Gently invert the dough onto a baking paper that will be large enough to lift your bread into and out of the dutch oven.
Gently score the bread with a sharp knife or bread lame.
Carefully remove the dutch oven from the oven, take off the lid and then carefully lift the dough into the pot using the baking paper.
Place the lid back on the dutch oven and put the dutch oven back into the heated oven.
Reduce the heat to 220ºC/200ºC for fan assist oven and bake for 25 minutes. Carefully remove the lid and bake for another 25 minutes with lid off.

Remove the pot from the oven and carefully lift out the loaf using the edges of the baking paper and let it cool completely on a wire rack.

Enjoy!


Sunday, 5 June 2022

Sourdough Focaccia


Say Hello to sourdough foccaccia!

Focaccia (pronounced fo-kah-cha) is a classic Italian "flatbread". Focaccia can be both sweet and savory, thin or thick, baked plain or adorned with variety of toppings. There are many styles to choose from.
You see, focaccia is a rustic and simple affair: it is slab of naturally leavened dough topped with simple ingredients, any vegetable in season, olive oil and salt. The beauty of this bread is that you can make it with little effort. First mix the dough in the morning then let it raise during the day, and finally bake it just before dinner. 
Learn how to make bubbly, fluffy sourdough focaccia bread that us incredibly versatile for eating on its own, with soup, or as sandwich bread. It has a golden crust, and delicious chewy crumb with subtle tang. 

Ingredients:
  • 100g Sourdough starter, active and bubbly
  • 400g water, can increase or decrease by 30g if desired
  • 500g bread flour
  • 10g salt
For the topping:
  • 30g olive oil
  • 10g sea salt
Method:

Weigh out your sourdough starter and water into a large bowl.

Mix the water and starter together briefly. Then add the flour and salt and mix whole lot together until it forms a sticky dough. You don't want any dry flour left at all.

Cover your bowl with cling film or a damp tea towel and let it sit for around 1 hour. It is OK if it's a little bit longer, it is not going to matter too much.

After the dough has been through autolyse, you need to bring it together into a ball. Work your way around the bowl, grabbing the dough from the inside, stretching it up and over itself, into the centre. You should feel the dough strengthen as you do this. It doesn't have to be perfectly smooth or tight, just work around the bowl stretching and folding (around 10-15 times).

Now you want to leave your dough to ferment. Cover it with tea towel or shower cap and leave it alone to double in size.

Once the focaccia has doubled in size, you need to shape the dough. Shaping focaccia is super simple. 

Use a dough scraper gently ease the dough out into your prepared pan. 

Rub your hand with a little olive oil and gently pulled the dough out to fill the tray. Again it doesn't have to be perfect as it will naturally fill the tray as it proofs.

Let your dough rise again. Leave it until it's spread out and filled the tray. It will be puffy and pillowy. You will see some large and small bubbles popping up.

Once the dough has filled the tray and is looking puffy and full of volume, you need to dimple the dough and add the toppings.

Pour olive oil over the top of the dough and then push your finger tips into the dough to create dimples. You might see some bubbles as you do this.

Now sprinkle with sea salt and rosemary if you desire.

Preheat oven to 200ºC. Bake for 30 minutes or until golden brown.

Wednesday, 19 May 2021

Wool Roll Bread


Soft and fluffy milk bread shaped into a wool roll is fun to make. The bread is filled with delicious cranberries or any other filling of your choice. I have tried cranberries & Nutella filling. It is a pull-apart milk bread you will absolutely love.
Lately this Wool Roll Bread has been very popular . It seems that the Wool Roll Bread has become trendy because of a Malaysia YouTuber "Apron".  The video was clear and easy to follow along. Wool Roll Bread is a soft fluffy bread loaf that bake with a round cake tin (or a round pot that can go into the oven). The special thing about it is the bread shaping method, which after baking, the bread looks like a roll of wool. That is why is called wool roll bread. Let make the unusual cool Wool Bread!

Ingredients:
  • 80ml lukewarm milk
  • 3g instant yeast
  • 300g bread flour
  • 1 tsp salt
  • 30g sugar
  • 1 egg
  • 100ml double cream
  • 100g dried cranberries or Nutella or any filling of your choice
  • 2 tbsp melted butter
  • 3 tbsp milk to brush the top of dough
Method:

Add 1 tsp instant yeast into the lukewarm milk. Stir well and keep it aside to bloom.

In a stand mixer, whisk together the flour, salt and sugar until well combined. Add in the cream, egg and yeast mixture. Use a dough hook attachment to combine the ingredients until dough ball is formed, about 2-3 minutes. Knead for another 6-8 minutes until it is smooth. When ready, shape dough into a ball, place in lightly greased bowl, cover and let it rest in arm spot for another 60 minutes, or until the dough is puffy and has doubled in size.
When the dough has doubled in size, tip it onto a lightly floured surface. Then, carefully deflated the dough. Using a bench scraper or a sharp knife, divide into 5 equal pieces.   
                                     

    Form dough pieces into balls. Cover and let them rest for 15 minutes.
  Roll each into a ball

    pull in the edges and overlap the dough
 Flip over and roll with seam down until the top is smooth and taut

 Let it rest for 15 minutes
                                       
While waiting, chop the dried cranberries. Set aside. Prepare the pan. Brush melted butter generously all over the inside bottom and sides. Line the pan with baking paper and brush with butter.

Take one of the dough balls, and roll out into a long oval approximately 12" long by 5" wide. Then using a very sharp knife or a bench scraper, cut a long thin lines from middle to the top of the dough piece.

 Place the dough ball on a lightly floured surface

 Roll out into a long oval

 Lightly mark/score the middle of the oval and start cutting the top part of the oval
 Place chopped berries or any filling of your choice into the bottom part
 Fold in one side

 Fold in the other side

 From the bottom, roll up the dough

 Keep rolling

 Tuck the seam under the rolled up dough

                                   
 Ready for the pan

Scatter about 1 tbsp of the chopped dried cranberries on the bottom uncut part of the dough. Fold in the sides and start to roll up the dough from the edge closest to you. Place the rolled up piece onto the prepared round pan with the seam side down. Repeat with the other 4 pieces of dough.

 Place dough balls into the lined pan

 Arrange them like so

 Cover with cling film
 After 60 minutes of proofing in a warm spot

Cover the shaped dough in cling film and let it rest for about 60 minutes until it has risen and looks poufy. Preheat oven at 170ºC/150ºC for fan assist oven.

When ready, brush the top of the bread with milk. Bake in the preheated oven for 20 minutes or until the top are golden brown. 

Remove pan from the heat. Let it cool in the pan for 10 minutes before inverting and popping out the pan. It's ready!