Tuesday 29 December 2020

Sourdough Multigrain Sandwich Bread


This is light and fluffy multigrain sandwich bread with seeds. Perfect for any sandwich or just toasted with your favourite jam. Multi bread is any type of bread made with more than one type of grain. Wheat is one type of grain; others include rye, spelt, barley and millet. 
The delicious flavour from the grains, seeds and sourdough starter makes thus bread stand out!


Ingredients:
  • 325g plain flour
  • 100g whole wheat four
  • 75g rye flour
  • 325g water
  • 100g sourdough starter
  • 50g olive oil
  • 25g honey
  • 10g salt
  • 25g quinoa
  • 25g flax seeds
  • 25g sunflower seeds
  • 25g pumpkin seeds
  • 2 cups of hot water
Method:
Start the night before by mixing the quinoa, flax seeds, sunflower seeds and pumpkin seeds with hot water and letting them soak overnight.

The next day combine the water and starter in a bowl, mixing the ingredients until the starter dissolves in the water. Add the rye flour, the whole wheat flour and the plain flour. Mix until all the ingredients are well incorporated. Cover with a towel and let it rest on the counter for 30 minutes. In the meantime drain all the seeds that you left soaked overnight.

After 30 minutes, add the olive oil, honey and salt, knead with your hands in the bowl, then add all the seeds and keep kneading in your bowl for about 2 minutes until all the ingredients are well incorporated. Cover with a towel and let the dough rest for 30 minutes.

After 30 minutes start a series of stretch and folds. Make sure that you stretch the dough well each time, cover with a towel and wait for another 30 minutes, repeat the same process 2 more times, waiting 30 minutes in between stretch and folds.

Get a dough scraper and start shaping your dough into a cylinder shape, stretching it well as you keep shaping it. Then transfer it seam side down to a greased 9x5 inch loaf pan. Cover it with a greased clingfilm. It is important to grease your clingfilm before covering your dough so the clingfilm doesn't stick to the dough. Let your dough proof in a warm place. 

Once the dough is double in size it is ready to bake. Brush it with some water and add some oats or any other seeds on top.

Place it in a pre-heated oven at 220ºC/200ºC for fan assist oven. Bake for 30 minutes. Wait at least 10 minutes before taking the bread out of the pan and let it cool at least 30 more minutes before slicing.


You can also watch a video by https://www.akneadtobake.com/post/sourdough-multigrain-sandwich-bread if you prefer to watch how to make this bread.
 

Monday 21 December 2020

Easy Pilau Rice


 An excellent side dish that is perfect for serving with a curry. With only a handful of ingredients, you can make this restaurant-style Indian Pilau at home!
Fragrant fluffy, aromatic basmati rice, packed with flavour and all cooked on the stove, this yellow rice is so much better than take-away and so easy to make at home.
Pilau which also know as pilaf, is rice that has been cooked in broth or stock with other delicious herbs and spices added. It is usually fluffy and packed with flavour. Many countries and regions have their own version of pilau.
The bright yellow rice that we all love gets its colour from turmeric. This earthy ground spice stains the rice that vibrant colour. It also adds depth to the flavour.

Ingredients:
  • 2 cups of basmati rice
  • 7 cups boiling water
  • ½ tbsp salt
  • ½ tsp turmeric
  • 2 cloves
  • 3 cardamom pods, lightly crushed
  • 2 inch cinnamon stick
For the onions:
  • 2 small onions
  • 3 tbsp vegetable oil
  • 1 tbsp butter
  • ½ tsp black mustard seeds
Method:

Rinse the rice in cols water a couple of times to remove any excess starch.

Place the rice in a bowl and cover with cold water, let it soak for 30 minutes to an hour.

Peel and slice the onions into thin half-moons. Heat the vegetable oil and butter in a large frying pan. Cook the onions over low heat until they have softened and are starting to caramelize. Add in the mustard seeds and stir gently.

While the onions are cooking, pour the water into a large pan and bring back to the boil. Add the salt, turmeric, cloves, cinnamon, and cardamom. Stir to dissolve the salt.

Add the rice to the water and stir gently. Bring to a simmer and cook for 8-12 minutes until the rice is soft. Note that there will be lots of water left in the pan.

Drain the rice, remove the whole spices, and set it to one side until the onions are cooked. Add the drained rice into the onions mixture and gently stir to combine. check the seasoning and add more salt if required.


Sunday 6 December 2020

Aubergine Bhaji


 Also know as brinjal!

The dish is filled with chunks of aubergine that's been baked with aromatic Indian spices, topped with fresh coriander and chilli.

This aubergine bhaji is actually also a vegan dish. The combination of the creamy , roasted aubergines and classic Indian spices is a satisfying one!

Aubergine bhaji or brinjal bhaji is a classic Indian side dish that pairs the rich, creaminess of aubergines with classic spices like garam masala and cumin. This recipe will serve 2 as a main or 4 as a side.

Ingredients:
  • 2 aubergines, about 600g, chopped in half lengthways 
  • 1 onion, finely chopped
  • 2 cloves garlic, minced
  • 1 tsp garam masala
  • 1 tsp ground cumin
  • 1 tsp ground coriander
  • ½ tsp chilli powder
  • 2 tbsp tomato puree
  • 6 tbsp water
  • handful of c=fresh coriander, roughly chopped
  • 2 tbsp cooking oil, or ghee if preferred 
Method:

Pre-heat the oven to 200ºC/180ºC for fan assist oven.

Cut the aubergines in half, brush oil on the skins. Lay with the flesh side down in an oven roasting tray. Roast the aubergines in the oven for 30 minutes, until the insides soften.

Remove the aubergines from the oven and once they are cool enough to handle, chop them into rough chunks, about 1 inch in size.

Heat the oil in a frying pan over a medium-high heat, then add the onion until it starts to soften and turn translucent. Add the garlic, spices and tomato puree and cook for a couple of minutes until fragrant.

Stir in the roasted aubergine and water, stir well, then reduce to a simmer. Cook for 10-15 minutes with the lid on, stirring occasionally.

Season to taste and stir in the coriander. 

Serve up with naan bread or chapatis alongside your favourite curry!

Chocolate Explosion Cake

This cake is so easy to put together. All you need is a chocolate cake, some chocolate frosting and a whole load of chocolate bars!

I baked the cake & make the frosting myself. However, if you don't have the time or didn't want to make a thing ....it will just be a complete assembly job, thanks to store-bought chocolate cakes, frosting and chocolate bars. 

If you plan to bake your own cake, there are few chocolate cake recipes & also chocolate frosting on my blog. 


What you need to make this cake:
  • 8" chocolate cake-bake yourself or shop bought. Make sure you have about 4" to 5" for the height
  • 1 can shop bought chocolate frosting, or make your own
  • KitKat bars, about 12-14 fingers
  • about 40 Maltesers, 2-3 regular bags
  • 40 Cadbury Chocolate Buttons, 3-4 treat size bags
  • Kinder Egg
  • M&M's
  • Reese's Peanut Butter Cups
  • Kinder Bueno, 2 bars
  • Cardbury Dairy Milk, 2 bars
  • Cardbury Flake, 2 bars
  • Milky Bar, 2 bars
Ultimately you can use whatever chocolate bars/candy bars that you like! You can also use just 2-3 types or like me go nuts and use ALL the choclate!


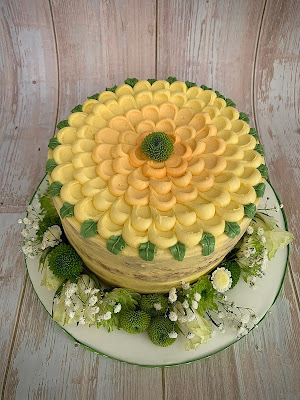
Zinnia Flower Cake

Simple piping, stunning results ! This is an easy technique using buttercream called petal effect. it is extremely easy and the results are very impressive. The Petal Technique uses a round tip on your piping bag and a small spatula or small teaspoon to create the effect. It's simple process, just very time consuming. 

What you need:
  • A cake, round looks the best for this technique but square or rectangle is ok
  • Buttercream icing
  • Food colouring
  • piping bags, depends on how many shades you prefer
  • A small spatula
  • 4 plain tips, if you prefer can use the piping bag too
  • Turning cake decorating table, very helpful but not a must
I found The Hungry Housewife blog is very helpful as she posted a tutorial on her blog that demonstrate both the omber and petal effect to decorate a cake. I am not going to include my step by step how I decorated the cake. I am going to let you read what she wrote. You can complete the cake as she did but I like to decorate mine with fresh flower and finished the base with fresh flowers too. Try to get the similar colour tone for the flower. Have a go, it is not that hard.


Saturday 21 November 2020

Zinnia Lemon & Mascarpone Drizzle Cake


Dramatic enough for a special occasions but simple and quick. It's a beginner project if you want to try your hand at cake decorating but don't want to buy a whole bunch of equipment. 
You can use this technique in many ways. Try a few flowers on the top and sides, frost the sides completely or try a semi-naked cake as what I did! You can use any frosting you like. Lemon buttercream frosting, cream cheese frosting & the classic butter cream frosting are my favourite. 
You can fill the layers with lemon curd, buttercream, jam & jellies or even fresh fruits. My cake for this project is lemon & mascarpone drizzle cake. 

So let's start baking & decorating!


For Lemon & Mascarpone Drizzle Cake

For the filling:
  • 2 large eggs, yolks only
  • 75g castor sugar
  • juice of 2 lemons, about 50ml and their finely grated zest
  • 30g unsalted butter
  • 125g mascarpone 
For the lemon sponge:
  • 200g castor sugar
  • 200g unsalted butter, softened
  • grated zest of 2 lemons
  • 3 large eggs, beaten at room temperature
  • 200g self rising flour
For the sugar topping:
  • juice of 4 lemons, about 100ml
  • 75g granulated sugar
Method:

Preheat oven to 180ºC/160ºC for fan assist oven. 

To make the filling: Beat the egg yolks with the sugar in a small pan, using a wooden spoon, until smooth. Beat in the lemon juice, zest and butter, and heat for 3-4 minutes, stirring all the time until thickened into a lemon curd. Allow to cool, cover and chill until needed.

For the sponge: Grease a 20cm round, springform cake tin or 2x 2ocm sandwich cake tin. Line the base with baking parchment. Beat the sugar, butter and lemon zest in a mixing bowl with wooden spoon or an electric hand mixer, until pale and fluffy. Gradually add the beaten egg, beating well after each addition. Finally, fold in the flour to give a very thick mixture. Spoon the mixture into the prepared tin. If you are using the sandwich pan, divide the batter between the tins. Smooth the surface with a spatula or the back of a spoon. Bake for 35-45 minutes for the 20cm round springform tin or 25-30 minutes for the sandwich tins and a skewer inserted into the centre comes out clean. Remove from the oven and prick with a cocktail stick or skewer for about 15-20 times.

To make the sugar topping: Stir the strained lemon juice into the sugar so it dissolves slightly, but not fully. Slowly drizzle over the warm cake, waiting a few moments before adding more, so that it all sinks in. It should leave a crust on the cake as the juices sink in. Remove from the tin and transfer to a wire rack to cool.

Using a serrated knife, slice the cake in a half horizontally. Do not need to do this if you are using the sandwich tins. Finish the filling by placing the mascarpone in a small bowl and swirling in the lemon curd. Lift off the top half of the cake and spread the base with the curd and mascarpone mixture. Replace  the top half. If you are using the sandwich tin, no need to half the cake. Just add the mascarpone and curd mixture over the bottom of one of the sponges and sandwich the second sponge on top. At this point you can cover and leave at room temperature until ready to serve.

However, I decided to take this cake to another level. Decorated with lemon buttercream and walah! A celebration cake!

Ingredients for Lemon Buttercream:
  • 250g butter, soft at room temperature
  • 500g icing sugar, sifted
  • zest of 5 lemons
  • 1 tbsp lemon juice
Method:

Beat the butter on a low speed until it is soft.

Add the icing sugar and beat until combined. Finely grate the zest of 5 lemons. Squeeze the juice from the lemons until you have 1 tbsp.

Add the mon zest to the buttercream and beat until it is evenly distributed. Slowly add the lemon juice, no more than 1 tsp at a time. Beat in each addition before adding more.

Check the consistency of your buttercream. It should be soft enough that you can spread but not runny. If it is a little stiff, then add a little milk until it is the right consistency. Your buttercream is now ready to use.


Friday 20 November 2020

Vegan Chocolate Cobbler


The batter bakes up and rises to the top, the sugar, cocoa and hot water end up on the bottom, and turn into a gooey fudge sauce.
This vegan chocolate cobbler takes minutes to mix up, and about 30 minutes to bake. it is actually best hot, so you can scoop it right out and slap some vegan ice cream on top and good luck putting the spoon down!
It taste like and extra gooey vegan brownie that has been drenched in chocolate sauce. You can skip the ice cream but I wouldn't dream of it. I think the hot cobbler  with the cold ice cream is the only way to eat any cobbler. It would be delicious with a vegan whip cream as well, but vegan ice cream is my go-to.

Ingredients:
  • 1 cup of plain flour
  • 2 tsp baking powder
  • ½ tsp salt
  • 2/3 cup sugar
  • 1½ tbsp cocoa powder
  • 28g butter, melted
  • ½ cup milk
  • 1tsp vanilla extract
  • ½ cup chopped walnuts, optional
Topping:
  • ¼ cup sugar
  • ½ cup brown sugar
  • ¼ tsp salt
  • 1 tbsp cocoa powder
  • 1 cup boiling water
Method:

Preheat oven to 180ºC/160ºC for fan assist oven.

In a medium sized mixing bowl, combine the flour, baking powder, salt, sugar and cocoa powder. Then stir in the melted butter, milk and vanilla.

Spread the mixture into a greased 9"x7" casserole dish or a square pan. Set aside. 

In another bowl, combine the dry topping ingredients (sugar, brown sugar, salt and cocoa powder). Sprinkle on top of the batter; DO NOT STIR.

Pour the boiling water on top, DO NOT STIR.

Bake for 30 minutes, or until the top of the cake is almost set. The cake will rise to the top and a pudding will form on the bottom.

Serve warm with ice cream.


Sunday 8 November 2020

Pretzel Bun


These pretzel rolls are easy to make at home and are just like the real German deal-shiny, salty, perfectly burnished, densely bread-y, and reminiscent of a soft pretzel but in a more versatile shape. Smother with butter, stuff with your favourite sandwich fixings, or inhale straight off the baking sheet!

These pretzel buns are an absolute must-try recipe for any baker! It is almost addictive-well, they certainly taste addictive anyway! Plus, it is nice to have a savoury baking recipe that isn't just regular bread or bread rolls- a little bit of changing things up is never a bad thing!

So delicious, chewy and soft....these pretzel bun recipe makes the perfect burger bun or fantastic soft pretzels

Ingredients:
  • ¾ cup water
  • 1 tsp instant yeast
  • 1 tsp sugar
  • 28g butter, melted & cooled to room temperature
  • 2¼ cups plain flour
  • 1 tsp salt
  • ¼ cup baking soda
  • 1 egg, beaten
  • kosher or pretzel salt to top rolls
Method:

In a large mixing bowl, combine the water, yeast, flour, butter, sugar and salt. If using a stand mixer, use the dough hook attachments to mix the ingredients, then knead at medium -high speed for 1 minutes. (This will help develop some gluten). If not using a stand mixer, you can also do this by hand or with a hand mixer fitted with the dough hooks.

Shape the dough into a ball and place it back into the mixing bowl. Cover with clean kitchen towel and let rise for 1 hour or until doubled in size.

Transfer the dough to a lightly floured surface. Separate into 4 to 5 equal portions if making hamburger bun sized buns or 8-10 equal portions if making dinner rolls. Form into balls by pulling the sides to the centre and pinching to seal. Place the formed rolls, seam side down onto a baking paper lined baking sheet. Cover with the towel and allow to rise again for 30 minutes.

Heat the oven to  210ºC/190ºC for fan assist oven. Bring 8 cups of water to a boil in a large sauce pan, then add ¼ cup of baking soda. Boil each roll for 1 minute, flipping over halfway. Place the boiled rolls back onto the lined baking sheet, seam side down. Brush the tops with beaten egg, then lightly sprinkle with salt.

Using a sharp knife or razor, slice 2-3 cuts into the top of each unbaked roll about ¼ inch deep or so. You can also slice a shallow "X" into the top of each roll. Bake for 15-20 minutes.

Serve warm or at room temperature. You can also freeze for later use in a freezer bag once cooled to room temperature

Notes: You can use vegan butter if you plan to make a vegan pretzel bun. Omit the egg brush for vegan pretzel roll.

Saturday 7 November 2020

Vegan Nut Roast

An easy vegan and gluten-free nut roast that is kept nice and moist with lentils and grated carrot. Vegans & vegetarian do not need to miss out on a delicious Sunday roast or Christmas dinner. This vegan nut roast is both easy to prepare and an easy pleaser!. It is wonderfully moist and flavourful with the addition of lentils and carrots, and the nuts, seeds and lentils mean it is also packed with nutritious plant-based protein. It can also be made with gluten-free soy sauce to make it suitable for coeliacs and those with gluten intolerance.

What's more, this nut roast can be prepared in advance and frozen for up to 3 months making it ideal for serving to occasional guests. Freeze in slices, thaw overnight and reheat in the oven each time your vegan or vegetarian guest visits.


Ingredients:
  • 200g red lentils
  • 1 onion, finely sliced
  • 50g sun-dried tomatoes (oil reserved), drain and chopped
  • 2 coves garlic, minced
  • 50g dried apricot, chopped
  • 200g mix nuts, chopped
  • 50g mixed seeds
  • 1½ tsp dried mixed herbs
  • 1 tsp soy sauce
  • 1 carrot, grated
  • 1 tsp turmeric powder
  • salt & pepper to taste
Method:

Preheat the oven to 180ºC/160ºC for fan assist oven.

Cook the lentils in plenty of water for 15 minutes, then drain using fine sieve.

While the lentils cook, heat a little of sun-dried tomato oil in your largest frying pan and gently fry the onion for 5 minutes.

Add all the other ingredients, except the seasoning, to the pan. Stir well, add the cooked lentils and stir again, seasoning to taste.

Line a loaf tin (approximately 20cm x 10cm) with baking paper. Spoon in the mixture.

Bake for 50 minutes and allow to cool slightly before removing and cutting into thick slices.

Easy Traditional Scottish Cranachan

A very traditional Scottish dessert, through and through. It was originally a celebration of harvest, made following the raspberry harvest in June. The dessert of cream and fresh seasonal raspberries is bolstered by Scottish oats and whisky.
This is a very quick, easy recipe and is also a very festival recipe so is perfect for any celebration and especially at Christmas. In it's classic form it has only 5 ingredients-oats, raspberries, honey, cream and whisky. You will sometimes hear the dessert called "crowdie", as the cheese of the same name was sometimes used instead of the whipped cream.


Ingredients:
  • 55g Scottish oats
  • 250g fresh raspberries
  • 475ml whipping cream
  • 3 tbsp malt whisky
  • 1 tbsp honey
Method:

Heat a large, heavy pan-based frying pan on the stove until hot, but not burning. 

Add the oats and continually stirring, toast the oats until they have a light, nutty smell and are only just beginning to change colour. Do not leave the oats unattended as the oatmeal can quickly burn, so they will need constant attention. Once toasted, remove immediately from the pan.

Keeping a handful of the raspberries to one side. Place the remainder into a food processor and whiz once or twice to create a thick puree. Do not over blend. It's ok if there is a few bigger lumps of fruits.

Alternatively, you can simply crush the raspberries with a fork, if you prefer. This will give you a more rustic-looking dish.

In a large, clean bowl, whisk the cream and whisky to form firm peaks. Take care not to over whip.

Finally, fold in the honey followed by the toasted oatmeal.

In either a large glass trifle bowl or into individual serving glasses, layer the dessert.  You can start with a layer of the cream or raspberries; it is up to you. Always finish with a layer of the cream and oatmeal. If you wish you can even sprinkle a little oatmeal on the top for decoration.

Cover the bowl or glasses with clingfilm and chill for a minimum of an hour.

To serve the cranachan, drizzle over a little extra honey and if you fancy, a piece or two of Scottish Shortbread.
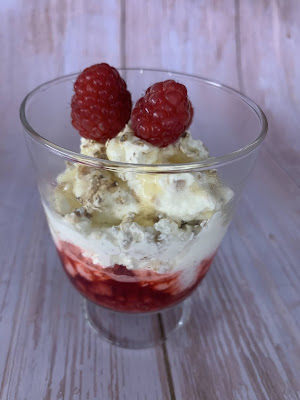
Serve & enjoy


Blueberry-Lemon Icebox Cake

This is an easy dessert to make. Looks complicated but trust me it is not. Once all the components are ready, it comes together easily. Take a little extra time to pop the cake in the freezer after adding each layer if only for ten minutes or so. Freezing between layers makes the final product much prettier and a little more tidy when sliced.
Yes, you can cheat for this dessert. If you don't want to make homemade pound cake, no worries; buy a pre-made or frozen cake and slice it up.
No homemade blueberry sauce? Buy a good jar of blueberry jam....ssshhh
Never made easy homemade lemon curd? You can buy that too but don't skip this homemade lemon mascarpone cream. With only 5 ingredients the cream mixes up in just a few minutes and really makes this dessert something special.


Tender pound cake layered between fluffy lemon curd mascarpone cream and fresh blueberry sauce for a wonderful frozen dessert you will be thrilled to serve!

Ingredients:

For the blueberry sauce:
  • 3 cups fresh or frozen blueberries plus 1/3 cup, divided
  • ½ cup granulated sugar
  • 2 tbsp water
  • juice of ½ large lemon, about 1 tbsp
For the lemon cream:
  • 250g mascarpone cheese, room temperature
  • ¾ icing sugar
  • 2 cups double cream
  • zest of 1 large lemon
  • 1 cup lemon curd, divided
  • 1 pound cake, about 9x5 inch, trim off the top, bottom and sides
Method:

Combine 3 cups of fresh or frozen blueberries with ½ cup granulated sugar and 2 tbsp water in a deep saucepan. Heat on medium until the mixtures begins to boil. Reduce the heat slightly to maintain a simmer, and cook until the blueberries pop and the sauce thickens, about 5 minutes. Add the lemon juice and cook until the mixture is almost reduced by half, about 10 minutes. You will need 1½ cups of sauce. Remove from the heat and cool. Refrigerate until ready to use. Keep extra 1/3 cup of fresh blueberries ready, they are added at the end.

When ready to make the icebox cake, line a 9x5 inch loaf pan with plastic wrap making sure there is a lot of extra hangover on all sides.  Set aside.

Prepare the pound cake by slicing into ½ inch pieces removing the dark ends, and sides if desired for a prettier presentation. Set aside.

To prepare the lemon cream: In a bowl of a stand mixer, combine the mascarpone cheese, icing sugar and lemon zest. Blend until smooth. Turn the mixer on low and slowly add the double cream until it's all mix well and starting to thicken. Increase the speed to medium, then high, and beat until medium peaks form. It won't take long.

Transfer 1/3 of the cream to a container with lid and refrigerate until needed. This will be used to "ice" the cake.

Gently fold in  ½ cup of lemon curd into the remaining mascarpone mixture. Now you are ready to assemble the icebox cake.

Place a layer of pound cake in the bottom of the prepared pan, cutting to fit as needed. Spread ¼ of the lemon cream over the cake and use the back of a spoon to smooth the surface (place the remaining lemon cream in the refrigerator until needed again).

Place the pan in the freezer for 10 minutes, then spoon ½ cup of the blueberry sauce in mounds over the lemon cream. Spread gently with a clean spoon to cover the cream. Place the pan back in the freezer for about 10 minutes.

Drizzle ¼ cup of the lemon curd over the blueberry sauce. Spoon 1/3 of the remaining lemon cream over the curd and smooth evenly with the back of a spoon. Top with another layer of pound cake.

Repeat the process with ½ of the remaining lemon cream, ½ cup blueberry sauce, and the remaining lemon curd, freezing between layers as needed.

Finish with a layer of the lemon cream and final layer of pound cake. The cake may extend over the top of the pan depending on how thick you cut the pound cake. This is where you need that extra long pieces of plastic wrap to come up and over the cake to hold it all in.

Wrap the entire cake in plastic wrap and freeze for at last 8 hours or overnight.

When ready to serve, remove the plastic wrap and invert the cake onto a serving platter. Peel off the plastic wrap and trim the sides of the cake with a knife, if desired, to make a straight edge.

Spread the top and sides of the cake with the remaining mascarpone cream. If needed, whisk the cream until soft peaks form again.

Place the iced cake in the freezer at least 15 minutes or until ready to serve.

To serve, mix the 1/3 cup fresh blueberries into the remaining blueberry sauce and spoon over the cake.

Sunday 1 November 2020

Hot Water Crust Pastry Hand Raised Chicken And Ham Pie

Hot water crust is a type of pastry used for savoury pies, such as pork pies, game pies and, more rarely, steak and kidney pies. Hot water crust is traditionally used for producing hand-made pies. It is perfect for shaping into pie cases because the high quantity of water present makes it hard and strong. The pastry is baked until rich brown in colour and stands up well to wet and heavy fillings. Hot water crust pastry requires the fat to be "hot" when added, rather than chilled as is needed for most other kinds of pastry. Ideally, making the pastry and shaping the case should be done a day ahead to allow the pastry time to firm up before filling and baking.


This hot water crust hand raised chicken and ham pie is full of warming familiar flavours-from thickly sliced ham to fragrant ground nutmeg, lovely mellow pistachios and sour cranberries, it's unmistakeably British

Ingredients:

For the pastry:
  • 375g plain flour
  • 375g strong white flour
  • 140g butter
  • 175g lard
  • 1 egg, for glazing
For the filling:
  • 1 large onion, chopped
  • 25g butter
  • 1 tbsp chopped rosemary
  • 1 tsp ground nutmeg
  • 400g boneless, skinless chicken thighs
  • 600-700g cooked ham, thickly sliced
  • 50g shelled pistachio nuts, chopped
  • 50g fresh cranberries
  • 50g dried cranberries
  • 3 tbsp thyme
  • 350g chicken breast fillet, cut into long 1cm thick slices
For the jelly:
  • 3 leaves gelatine
  • 350ml strong chicken stock
Method:

For the pastry: Mix together the flours and 2 tsp salt in a large bowl, then make a well in the centre. Put the butter and lard into a small pan with 200ml water and very gently melt. Turn up the heat and, when just bubbling, pour into the well and mix together with a flat-bladed knife

When you can handle it, knead the dough so it all comes together. Tip the dough onto a floured surface and bring together into a ball. 

Warp a piece of clingfilm around 6 clean, empty, straight-sided jam jars (approximately 340g size.) Divide the pastry into 6 portion, then remove a quarter from each portion for the lids of the pies.

With the remaining three-quarters of the pastry, place on a flat surface and place a jam jar on top of the pastry in the middle. Sculpt the still warm pastry around the dolly, try and make sure the pastry is an even thickness. Make sure the bottom is not too thick and that there is no holes in the pastry.

Chill the pie bases in the fridge for about 20 minutes. You can also make the case one day ahead as I do always.

Roll out the reserved quarter of pastry into a circle to match the size of the pie top. Make a hole in the centre of each one and shill in the fridge.

Take the pastry cases out of the fridge and carefully pour boiling water from a kettle into each jam jar to soften the pastry and release it from the mould. If it softens too much and begins to sag you may need to chill again for 10 minutes or so. Trim the top of the pie shells to make sure they are even.

For the filling: Soften the onion in the butter with the rosemary and nutmeg, then set aside to cool. 

Whizz the chicken thighs and 300g of the ham in a food processor until minced. Put into a large bowl and add the onion, pistachios, cranberries and thyme. Season well.

Evenly cover the 6 bases with half the remaining sliced ham, followed by half the chicken breasts and half the mince mixtures, pressing firmly to pack. Repeat with the remaining ham and chicken, then a rounded dome of mince. Roll the reserved dough to a circle large enough to easily cover the pie. Brush the edge of the pie with some beaten eggs and top with the pastry lid. Press to seal the edges before trimming the excess. Crimp the edges with a fork to seal.

Make a small hole in the middle for a pie funnel if you have one, or a large piping nozzle works just as well. Brush the top of the pie with more beaten egg, decorate with any trimmings then glaze.

Heat oven to 180ºC fan assist oven. Bake the pies for 1 hour. Very carefully removes the pies from its tin brush the top and side with more egg and bake for another 30 minutes until browned and crisp. Leave to cool completely before putting in the fridge.

To make the jelly: Soak the gelatine in cold eater for 5-10 minutes until soft. Squeeze out any excess water, then dissolve in the hot stock. Allow to cool for 10 minutes, then slowly pour it into the pies through the small hole ( you could use a funnel or small jug) until full-you may not need all the stock. Chill the pies for a few hours.


Wednesday 28 October 2020

White Chocolate Raspberry Tart

A deliciously rich and creamy and no-bake white chocolate tart. It's full with fresh raspberries and has a sweet digestive biscuits crust!


Ingredients:

For the crust:
  • 300g digestive biscuits crumbs
  • 50g granulated sugar
  • 115g unsalted butter, melted
For the filling:
  • 350g white chocolate, chopped
  • 120ml double cream
  • 55g unsalted butter
  • 250g fresh raspberries
Method:

For the crust: Stir together the biscuit crumbs and sugar. Add the melted butter and mix until all the crumbs are moist.

Press the mixture into the bottom and up the sides of an un-greased 9" fluted tart tin with a loose base. Refrigerated whilst preparing the filling.

For the filling: Place the chocolate, double cream and butter in a microwave-safe bowl, and heat in 20 second intervals, stirring after each one, until melted and smooth.

Place the raspberries onto the bottom of the crust, and pour the white chocolate on top. Refrigerate until firm, about 2 hours. 

Enjoy!


Tuesday 27 October 2020

Vegan Mango Cheesecake Tart

This mango cheesecake tart with jelly layer is light, creamy, fruity, smooth and very very delicious. 


Ingredients:

Crust:
  • 50g almond, or any choice of nuts you prefer
  • 110g rolled oats or granola
  • 140g soft dates, pitted
Mango Cream Layer:
  • 345g silken tofu
  • 250g mango puree
  • 80g maple syrup
  • 32g corn starch
  • 3 tbsp lemon juice
  • 1 tsp vanilla extract
  • 22g coconut oil, melted
  • 1/8 tsp turmeric
Mango Jelly:
  • 160g mango puree
  • 60g water
  • 1½ tbsp lemon juice
  • ¼ tsp agar agar powder
  • a pinch of turmeric powder
Method:

For the crust: Grease a pie pan or tart pan and preheat the oven to 180ºC or 160ºC for fan assist oven.

In a food processor, firstly add the nuts and roll oats or granola. Give it a quick whisk. Then add the dates. Process until the mixture sticks together when you press it between your fingers. If it's too dry, add more dates and if it's too sticky, add more oats or granola.

Press the crust evenly into the bottom of the pie/tart pan and up the sides. Set aside.

For the mango cream layer: Process all the mango cream layer ingredients in a food processor or a hand blender until completely smooth and creamy. Pour the cream into the pan and spread it evenly.

Bake in the oven for about 35 minutes. Depending on your oven it might take a few minutes less or more.

Once done, take the pie out of the oven and let it to cool at room temperature until it isn't hot to touch. Then put it into the fridge to set. To speed up the process you can put the pie in the freezer for about 30 minutes.

For the jelly layer: Pour water in a saucepan or skillet, add agar agar powder and turmeric and bring to a boil. Stir until the agar agar powder is dissolved.

Add lemon juice and mango puree, stirring constantly.

Next, strain the mixture through a fine-meshed sieve into a medium sized bowl. Finally, pour the mixture on the mango pie, spread it evenly by slightly tilting the cake to all sides and place the pan in the fridge to set.

Slice and enjoy