Monday 13 May 2024

Lemon Cream Pie


Unbelievably creamy lemon pie is just like key lime pie with a lemon twist. Don't let the name fool you, this easy lemon cream pie may be luscious, but it is simple to create! This luscious lemon cream pie recipe uses condensed milk, grated lemon zest, fresh lemon juice and with fresh whipped cream topping. A super easy spring or summer dessert and a great alternative to lemon meringue pie.


Ingredients:

Crust:
  • 180g digestive biscuits
  • 1 tbsp granulated sugar
  • 85g butter
Filling:
  • 2 cans sweetened condensed milk
  • 2 large egg yolks
  • ¼ tsp salt
  • 2 tsp lemon zest
  • ¾ cup fresh lemon juice
Whipped cream:
  • 1 cup double cream
  • ¼ cup icing sugar
Method:

Preheat oven to 175ºC/165ºC for fan assist oven.

In a food processor, crush digestive biscuits until they resemble fine crumbs. Add sugar and combine. Melt butter in microwave. Add to crumb mixture and mix until all crumbs are wet. Press evenly into the bottom and up the sides of a standard 9 inch pie dish.

Bake crust for 8-10 minutes or until golden brown.

Prepare the filling while crust bakes. In a medium bowl, whisk together the sweetened condensed milk, egg yolks, salt, lemon zest and lemon juice. Pour into hot crust and bake an additional 10-12 minutes, until filling is solid when  jiggled in the pan.

Cool completely at room temperature, then refrigerate 3 hours, or until chilled.

Whisk double cream and icing sugar with a hand whisk or stand mixer until stiff peaks form. Dollop or pipe onto top of pie before serving.


Monday 6 May 2024

Dhaba Chicken Curry


A traditional North Indian dish inspired by the road side restaurants known as Dhabas. Rustic chicken curry cooked in a rich onion-tomato masala flavoured with basic Indian spices. Juicy and succulent marinated chicken pieces are cooked in a simple, spicy tomato onion curry flavoured with whole spices, ginger, garlic and yogurt. I served the Dhana Chicken Curry with rice and my homemade sourdough roti/Phulka. The link is: https://yummymummyrecipes.blogspot.com/2023/05/sourdough-rotiphulka.html

Ingredients:

For marination:
  • 600g mini chicken fillet, or choice of your preferred chicken part  
  • 1 tsp ginger garlic paste
  • 1 tbsp lime juice
  • ½ tsp salt
  • 1½ tsp Kashmiri red chili powder
  • ¼ garam masala powder
For the curry:
  • 5 tbsp cooking oil
  • 3-4 whole cloves
  • 4-5 whole black peppercorns
  • 1 inch piece of cinnamon stick
  • 2-3 whole dry red chillies
  • 1 cup grated red onions
  • 1 tsp chopped ginger
  • 1 tsp chopped garlic
  • ½ cup chopped tomatoes
  • ¾ cup plain yogurt, whisked with 2 tsp plain flour)
  • 1½ tsp coriander powder
  • ½ tsp turmeric powder
  • 1½ tsp Kashmiri red chili powder
  • 1 tsp salt or to taste
  • 1 tsp cumin powder
  • 1 tsp garam masala
  • 1 tbsp Kasuri methi
  • 3 tbsp chopped coriander
Method:

For marination: Add chicken, ginger-garlic paste, lime juice, salt, red chili powder and garam masala powder in a large mixing bowl. Mix well until all combine. Set aside while making the curry.

For the curry: Lightly crush cloves, black peppercorns and cinnamon stick in a mortar and pestle and set aside.

Heat the oil in a large pan on high heat. Once the oil is hot, add the crushed spices and dry chillies and let them crackle for 2-3 seconds.

Add the red onions and cook on medium-high heat until they turn slightly brown, about 5 minutes, stirring frequently.

Add ginger and garlic and cook until onions are nicely browned. (about 5 minutes).

Now, add the marinated chicken to the pan and cook for 5-6 minutes, stirring frequently.

Add tomatoes and cook for another 2-3 minutes.

Add yogurt and cook for another 2-3 minutes.

Now add coriander powder, turmeric powder, red chili powder, cumin powder and salt and mix well.

Reduce the heat to low.

Add ½ cup of water and mix well.

Cover the pan with a lid and cook on low heat until the chicken is tender (about 30 minutes). Stir a few times while cooking.

Add garam masala and Kasuri methi and cook for another minute.

Add some water if the curry is too thick, and bring it to a boil.

Check for salt and add more if needed. Garnish with chopped coriander and serve.

Fudgy Oreo Brownies


Raise your hands if you love brownies? How about Oreo cookies? Well, today I have combined the two to create the ultimate brownie recipe. You are absolutely going to LOVE these!!!
This brownie are thick, fudgy and rich in flavour. I stuffed them with whole Oreos, and topped them with broken ones. Perfection. 
You won't be able to stop at just one brownie-trust me.

Ingredients:
  • 300g dark chocolate, chopped 
  • 200g butter
  • 200g plain flour
  • 50g cocoa powder
  • ½ tsp baking powder
  • 300g brown sugar
  • 4 large eggs
  • 2 tsp vanilla extract
  • 28-30 Oreo cookies
Method:

Grease and line a 9 inch square cake tin with baking paper. Preheat the oven to 170ºC /160ºC for fan assist oven.

In a pan, combine the cooking chocolate and butter. Heat over low heat until fully melted, stirring occasionally. Once melted, allow it to cool for a few minutes.

In a mixing bowl, whisk together the brown sugar, eggs and vanilla extract until fully combined.

Add the cooled chocolate mixture to the bowl and whip until the mixture is fully combined, smooth and glossy.

Sift in the plain flour, baking powder and the cocoa powder in the brownie batter. Mix well with a silicone spatula until the batter is thick and glossy.

Pour half of the brownie batter into the prepared cake tin, smoothing it out evenly.

Lay 20 Oreos on top of the batter in the tin in a single layer.

Pour the remaining brownie batter over the Oreos, smoothing the top with an angled spatula.

Break the remaining Oreos into pieces and scatter them over the top of the batter, pressing them in lightly.

Bake in the preheated oven for 35-40 minutes, or until a skewer inserted into the centre comes out mostly clean with few moist crumbs.

Allow the brownies to cool completely in the pan on a wire rack.

For a thicker, fudgy texture, refrigerate the brownie overnight before cutting. This also helps in achieving clean-cut lines. 

Sunday 5 May 2024

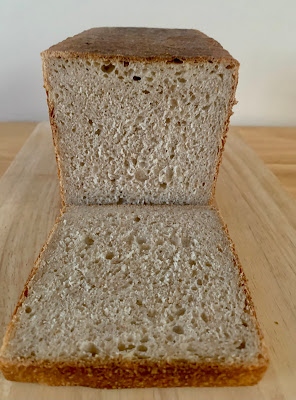
Sourdough Farmhouse Sandwich Loaf


Soft and fluffy sourdough bread is the perfect bread to have on hand. Made with white and wholemeal bread flour, active sourdough starter, butter and a little sugar, this fermented bread has a lighter texture and tangy flavour.
Not only this recipe absolutely delicious ( making it really hard to ever go back to store-bough bread), but it is also super simple. No strange ingredients, no stretching and folding every 30 minutes.....Just mix, rise, shape, rise again and bake!!!
Let it cool, slice and slather it with butter. It is so yummy and it reminds me of a bread you would get on a breadboard from a restaurant.
Let's be honest, though, it is wat better since it's made from scratch and has that wonderful sourdough tang. 


Ingredients:
  • 270g warm water
  • 85g warm milk, can substitute with plant-base milk
  • 45g sugar
  • 120g active sourdough starter
  • 50g butter, melted and cooled, can substitute with plant-base butter
  • 400g white bread flour
  • 200g wholemeal bread flour
  • 12g salt
Method:

Premix and autolyse: Add the milk, water and sugar in a large mixing bowl and stir until the sugar dissolved.  

Now add the sourdough starter to the liquid ingredients and stir to dissolve it a little.

Now add the rest of the ingredients; bread flours, salt and melted butter. Mix them together until a shaggy dough forms. Cover with a shower cap or a tea towel and let it sit for an hour.

Kneading the dough: You can knead this by hand or a stand  mixer. If kneading by hand, knead the dough for 10 minutes or until it is soft and elastic. The dough should feel slightly sticky but not be a big mess.
If using stand mixer, which is my favourite. You need to use the dough hook. Knead for 2-3 minutes, then give the mixer a rest for 2 minutes. Repeat this process in total 3 times. The dough should come away from the side of the bowl when it is done.

Bulk ferment: Once the dough is kneaded sufficiently, you need to bulk ferment the dough. If you are using a stand mixer, it is fine to leave it in the mixing bowl. At this point you can just leave the dough as it is, covering it with shower cap or tea towel to stop it drying out. 

As with any sourdough bread, the bulk ferment time depend on the temperature in your kitchen and of course the strength of your starter.  You are  looking for your dough to be just UNDER double.

Shaping: Once the dough has finished its bulk ferment you can shape your dough. Before you start shaping, lightly butter or oil the loaf pan.

ease the dough out the bowl using a silicone dough scraper, remembering to have the smooth side on the counter and the sticky side facing up. You shouldn't need any flour for this as your dough shouldn't stick.

Gently ease your dough out into a rough rectangle, with the shortest side in front of you.

Pop any large bubbles and gently flatten the dough using your fingertips.

Then roll the dough up into a log and tuck the ends under. Leave the dough to sit and relax for around 30 minutes.

After 30 minutes. tighten up the log by pulling the dough a little, using the sticky underside to create tension. Then simply plop the log into your oiled tin.

Second rise: Once the bread has been shaped and is in the tin, you will need to let it rise again so that it fills up the shape of the tin.

This should only takes a few hours but like bulk ferment, this will depends on the strength of your starter and the temperature  of your kitchen.

You will know it is done when it's risen above the lip of the tin (if you are using an open tin) It will be rounded on the top. When you poke it, it will leave a slight indent but spring back nice and slowly.

If you shaped it quite tight, you will see some tension on top of the dough as it's risen.

Baking: Preheat the oven around 180ºC. Let the oven warm for around 1o minutes and then place the sandwich loaf tin in the oven and bake for approximately 40 minutes or until the top is golden brown.

Once the dough is baked, remove it from the tin and leave to cool on a wire rack. Brush the top with some melted butter for a richer flavoured and soft crust.

Ideally, leave it for at least 90 minutes before you cut into it.

Enjoy!!!


Vegan Sweet Potato Chickpea Stew


A super healthy vegan stew that is easy to make and oh-so-satisfying, this sweet potato and chickpea stew is ready in under 1 hour. The stew is naturally vegan  and gluten-free and has well-balanced flavours for the perfect winter comfort meal. I like to add baby spinach to get more iron in the diet  as well as vitamin C as spinach is also rich with it.
I typically use Indian spices for vegan stews and soups. You can make this vegan sweet potato stew as spicy as you like, by adding more or less chilli. 
You can serve this stew over rice, quinoa, or with some crusty bread for an easy plant-based dinner. 


Ingredients:
  • 3-4 tbsp cooking oil 
  • 1 large onion, chopped
  • 4 cloves garlic, minced
  • 2 tsp smoked paprika
  • 1 tsp cinnamon powder
  • 1 tsp cumin powder
  • ½ tsp chilli flakes
  • 1 can chopped tomatoes
  • 2 can chickpeas, drained
  • 2 medium sweet potatoes, cut into 1 inch chunks
  • 1 can coconut milk
  • 2-3 handful baby spinach
Method:

In a large pot, heat the cooking oil and fry the onion over medium heat for 3-4 minutes until softened and slightly golden. Add the garlic and continue to cook for another minutes until fragrant.

Add all the spices to the pan and mix them in. Next, stir in the chopped tomatoes and cook for 2-3 minutes until the sauce thickens a bit.

Next, add the chickpeas an sweet potatoes to the pot and pour in the coconut milk. Mix everything well and bring to a boil. Lower the heat, cover with a lid and cook for 15 minutes until the potatoes are fork tender.

Add the baby spinach to the pot and cook for another minute until the spinach wilts. Serve over rice, quinoa or some crusty bread.