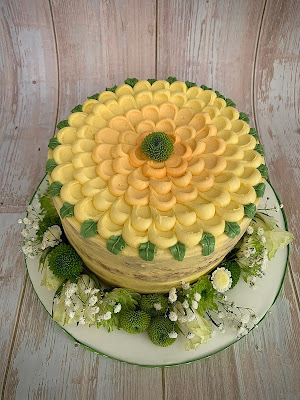
Dramatic enough for a special occasions but simple and quick. It's a beginner project if you want to try your hand at cake decorating but don't want to buy a whole bunch of equipment.
You can use this technique in many ways. Try a few flowers on the top and sides, frost the sides completely or try a semi-naked cake as what I did! You can use any frosting you like. Lemon buttercream frosting, cream cheese frosting & the classic butter cream frosting are my favourite.
You can fill the layers with lemon curd, buttercream, jam & jellies or even fresh fruits. My cake for this project is lemon & mascarpone drizzle cake.
So let's start baking & decorating!
For Lemon & Mascarpone Drizzle Cake
For the filling:
- 2 large eggs, yolks only
- 75g castor sugar
- juice of 2 lemons, about 50ml and their finely grated zest
- 30g unsalted butter
- 125g mascarpone
For the lemon sponge:
- 200g castor sugar
- 200g unsalted butter, softened
- grated zest of 2 lemons
- 3 large eggs, beaten at room temperature
- 200g self rising flour
For the sugar topping:
- juice of 4 lemons, about 100ml
- 75g granulated sugar
Method:
Preheat oven to 180ºC/160ºC for fan assist oven.
To make the filling: Beat the egg yolks with the sugar in a small pan, using a wooden spoon, until smooth. Beat in the lemon juice, zest and butter, and heat for 3-4 minutes, stirring all the time until thickened into a lemon curd. Allow to cool, cover and chill until needed.
For the sponge: Grease a 20cm round, springform cake tin or 2x 2ocm sandwich cake tin. Line the base with baking parchment. Beat the sugar, butter and lemon zest in a mixing bowl with wooden spoon or an electric hand mixer, until pale and fluffy. Gradually add the beaten egg, beating well after each addition. Finally, fold in the flour to give a very thick mixture. Spoon the mixture into the prepared tin. If you are using the sandwich pan, divide the batter between the tins. Smooth the surface with a spatula or the back of a spoon. Bake for 35-45 minutes for the 20cm round springform tin or 25-30 minutes for the sandwich tins and a skewer inserted into the centre comes out clean. Remove from the oven and prick with a cocktail stick or skewer for about 15-20 times.
To make the sugar topping: Stir the strained lemon juice into the sugar so it dissolves slightly, but not fully. Slowly drizzle over the warm cake, waiting a few moments before adding more, so that it all sinks in. It should leave a crust on the cake as the juices sink in. Remove from the tin and transfer to a wire rack to cool.
Using a serrated knife, slice the cake in a half horizontally. Do not need to do this if you are using the sandwich tins. Finish the filling by placing the mascarpone in a small bowl and swirling in the lemon curd. Lift off the top half of the cake and spread the base with the curd and mascarpone mixture. Replace the top half. If you are using the sandwich tin, no need to half the cake. Just add the mascarpone and curd mixture over the bottom of one of the sponges and sandwich the second sponge on top. At this point you can cover and leave at room temperature until ready to serve.
However, I decided to take this cake to another level. Decorated with lemon buttercream and walah! A celebration cake!
- 250g butter, soft at room temperature
- 500g icing sugar, sifted
- zest of 5 lemons
- 1 tbsp lemon juice
Method:
Beat the butter on a low speed until it is soft.
Add the icing sugar and beat until combined. Finely grate the zest of 5 lemons. Squeeze the juice from the lemons until you have 1 tbsp.
Add the mon zest to the buttercream and beat until it is evenly distributed. Slowly add the lemon juice, no more than 1 tsp at a time. Beat in each addition before adding more.
Check the consistency of your buttercream. It should be soft enough that you can spread but not runny. If it is a little stiff, then add a little milk until it is the right consistency. Your buttercream is now ready to use.


No comments:
Post a Comment