Saturday, 20 July 2024

Vegan Chocolate Cake with Peanut Butter Buttercream and Chocolate Ganache


This decadent vegan chocolate peanut butter cake is perfect cake for all occasions, including birthdays, weddings, graduations, holidays, parties or really any time that you want to make a cake!
Super moist vegan chocolate peanut butter cake made with layers of tender and rich vegan chocolate cake between irresistible peanut butter buttercream frosting. No one will know this cake is vegan and dairy free!
Rich and moist vegan chocolate cake between inches of creamy and sweet creamy peanut butter frosting that's naturally vegan and dairy free and chocolate ganache on top!!! It's truly one of the vegan cake recipes that you will keep going back to!
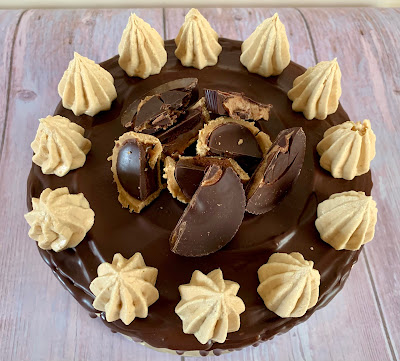
Oh and decorated with vegan peanut butter cups, because if you are already this far, you might as well go all out.


Ingredients:

For the vegan chocolate cake:
  • 550g self raising flour
  • 125g cocoa powder
  • 450g light brown sugar
  • 600ml plant-based milk
  • 2 tsp vanilla extract
  • 265ml sunflower oil
  • 1½ tbsp white wine vinegar
  • 6-7 peanut butter cups for decoration
For the Peanut Butter Buttercream:
  • 112g vegan butter, room temperature
  • 85g smooth peanut butter
  • 360g icing sugar
  • 1 tsp vanilla extract
  • 1-3 tbsp soy milk or any non-dairy milk **
For Chocolate Ganache:
  • ½ cup chocolate chips
  • ¼ cup vegan double cream
Method:

For the cakePreheat oven to 180ºC/160ºC for fan assist oven. Line and grease 3x 8 inch (20cm) cake tins with baking paper on the bottoms.

In a large bowl, add the self raising flour, sugar and cocoa powder. Whisk them together so that they are evenly distributed.

Pour in the milk, vanilla extract, oil and white wine vinegar. Mix the mixture until smooth-try not to over-mix however. I just use a spatula.

Split evenly between the three tins, and bake for 30-35 minutes.

Once baked, leave it to cool in the tins for 10 minutes, and then remove onto a wire rack to cool completely. Be careful when handling the sponges as they will be very soft and could break easily.

Once the cake has cool completely, refrigerate the cakes for 1-2 hours before decorating to make them easier to handle

For the Peanut Butter Buttercream: Add vegan butter, peanut butter, icing sugar, vanilla extract and soy milk to the bowl of a stand mixer.

Starting at slow speed, gradually increase speed until your frosting is thick and smooth. Set aside.

For Chocolate Ganache: Heat cream in the microwave. Pour over the chocolate. Wait for 5 minutes then stir until smooth. Wait until the ganache to cool so it isn't as runny.

To assemble the cake: Place one cake layer onto a cake plate or stand, and add about ½ of the frosting to the top of the cake layer. Use a flat cake knife to smear the frosting until it meets the edges. Place the second layer on top and repeat. Place the third layer on top, and smooth any frosting that is poking out between the layers (almost like creating a crumb coating). Place the cake in the fridge for 30 minutes. 
After the initial crumb coat is set, apply the final layer of frosting. Put in the fridge for 30 minutes for the frosting to set.

Once the frosting is set, pour the cool ganache over the middle of the top cake, and around the edges, letting it make decorative drips down the sides of the cake. Chill the cake in the fridge for another 30 minutes before adding the rest of the decorative frosting.

Use a decorative frosting tip to pipe swirls around the edges of the cake. Chop the peanut butter cups into half or quarters and top it in the centre of the cake. 

Slice & Enjoy!!!

Notes: ** the amount of soy milk use may be more or less depending on how soft your vegan butter is. If you use a very firm block style vegan butter you may need 2-3 tablespoons of non-dairy milk and if you use a soft tub-style vegan butter you may only need 1 tablespoon.


Saturday, 13 July 2024

Chicken Madras


A rich, fragrant and relatively hot curry, chicken madras is easy to make at home in one pan. Serve with your favourite naan, flatbread, or basmati rice, its a great Friday night curry!!
I like a hot curry now and then, but not so hot you can't taste the flavours and you are sweating at the table! This curry can be made as hot as you like. We are using madras hot curry powder for the heat, but you can add in more heat with fresh chillies, or less heat by swapping out the madras powder to regular medium or mild curry powder.
Usually you blend the onions, garlic, ginger and tomato into a smooth paste but you can use this simple recipe tips. This curry sauce is not completely smooth, but it is so rich, tasty and flavourful. You can cook everything in one pan and no need to use a food processor. Perfect curry to cook for busy days.

Ingredients:
  • 4 cloves garlic, finely grated
  • 1 tbsp ginger, finely grated
  • 1 medium size onions, finely chopped
  • 3 tbsp tomato puree
  • 3 tbsp cooking oil
  • salt to taste
  • 1 tsp dried fenugreek leaves
  • some coriander to serve and garnish
  • 1½ cup water
Chicken & Marinade:
  • 450g-500g chicken breast
  • ½ tsp turmeric
  • ½ tsp paprika
  • ½ tsp Madras curry powder
  • ½ tsp salt
  • 1 tsp cooking oil
Spices:
  • 1 tsp Madras curry powder
  • 1 tsp paprika powder
  • 1 tsp cumin seeds
  • 1 cinnamon stick
  • ½ tsp turmeric
Method:

Cut the chicken breast into medium bite pieces. Mix the chicken pieces well with turmeric, paprika, curry powder, salt and oil. Let it sit aside and marinate for 10-15 minutes.

Gather all the spices, finely chop and grated onions, garlic, ginger and coriander.

In a large pan, heat the oil over medium-high heat. Sauté the cumin seeds and cinnamon tick for a few seconds.

Add the chopped onion and sauté until translucent, then follow with the garlic and ginger paste. Stir continuously, until the onion are light brown. Then place the chicken pieces, turmeric, paprika and curry powder, and stir for a minute.

Follow with tomato puree and water. Stir well until all the ingredients are combine evenly.

Crush the dried fenugreek in hand and sprinkle over the chicken. Close the lid and cook with low heat for 8-10 minutes until the meat is tender.

Add salt to taste. If the gravy is too thick, add a bit more water to your preference consistency. Turn off the heat and transfer to serving plate.

Garnish with chopped coriander and serve with basmati rice or naan or even both!!

Enjoy!!!

Tuesday, 9 July 2024

Basque Burnt Cheesecake With Blueberry Compote


Basque cheesecake is an iconic baked cheesecake hailing from San Sebastian in Spain's Basque County (hence the name!) It's a crustless cheesecake ( I promise you won't miss the biscuit crust!) with a signature "burnt" surface. To me, Basque Cheesecake taste like crème caramel, with the caramel flavour of the golden surface and patchy sides, and vanilla cheesecake underneath.
The texture of Basque Cheesecake is unique, much lighter than most cheesecakes. 

Everything about this cheesecake recipe is unique, starting with how you prep the pan. You coat the entire pan with butter. Then press in one layer of baking paper so the sides stick up. Smear on another layer of butter and press in one more layer of baking paper.
You want to make sure the paper reaches about 2 inches above the pan as this cheesecake puffs up quite a bit as it bakes. Also fold in the wrinkles to get the edges as smooth as possible. It doesn't have to be perfect. The more "rustic" style looks good on this cheesecake!!

To make the burnt cheesecake, you mix up all the ingredients, pour it into your pan, and bake. No water bath, no temperature changes, just let it do it's thing. Talk about a low maintenance recipe.

It's traditional to serve this cheesecake at room temperature as opposed to regular cheesecake. Let it cool in the pan, remove, slice and serve. This is where I didn't stick to tradition. I let my cheesecake chill in the fridge out of habit. It still gave me a super creamy centre. Top it with fruit, chocolate, whipped cream, caramel, or any fruit compote. This cheesecake is a blank slate that can be enjoyed alone or with a little something extra!


Ingredients:
  • 600g full fat cream cheese, room temperature
  • 175g castor sugar
  • 3 large eggs, room temperature
  • 300ml sour cream, room temperature
  • ¼ tsp salt
  • 25g corn flour
For the Blueberry Compote:
  • 300g blueberries, fresh or frozen
  • 2 tbsp sugar
  • 1 tbsp lemon juice
  • 1 tbsp water
Method:

Heat the oven to 200ºC or 180ºC for fan assist oven.  
Get a 20cm springform pan, coat the entire pan with butter. Then press in one layer of baking paper so the sides stick up. Smear on another layer of butter and press in one more layer of baking paper. You want to make sure the paper reaches about 2 inches above the pan as this cheesecake puffs up quite a bit as it bakes. Also fold in the wrinkles to get the edges as smooth as possible. It doesn't have to be perfect. 

You could easily use a large mixing bowl, wooden spoon and elbow grease but I use a freestanding mixer fitted with the flat paddle. First beat the cream cheese with sugar until light and smooth, for about 2-3 minutes.  Beat in the eggs, one at a time, waiting for each one to be incorporated before adding the next, and when they are all mixed in, pour in the sour cream.

Once that is also incorporated, you can slow down the mixer a little and beat in the salt, followed by the cornflour, one teaspoon at a time. Remove the bowl from the mixer, scrape down the sides with a spatula and give everything a good stir.

Pour into the lined tin and then rap the filled tin on the work surface about 3-5 times to get rid of any air bubbles. 

Place in the oven and bake for 45 minutes, by which time the cheesecake will be a burnished bronze on top, even chestnut brown in places, and it will have risen, like a dense soufflé. It will however, still be very jiggly. It's meant to be. You will think it is undercooked, but it will carry on cooking as it cools, and it should have soft set, anyway.

Remove the tin to a wire rack and leave to cool. It will sink in the middle a little, but that too is part of its traditional appearance. I reckon it's cool enough to eat after 3 hours, although you may need to leave it for a little longer.

Make the blueberry compote: Once the cheesecake is out of the oven. Add the blueberries, sugar, lemon juice and water to a pot, stir and bring to the boil. Allow it to boil for about 5 minutes, stirring often to stop it from scorching.

Reduce the heat to low  and let it simmer and thicken for 10 minutes. It will thicken further as it cools. If necessary, stir 1 teaspoon cornflour into 1 teaspoon water, add it to the blueberry compote and cook for a further minute. Let the compote cool.

Before serving, unclip and lift the sides of the tin up and away, and then lift the cheesecake up with the edges of the baking paper. Place this on a board, and peel the paper back, and take it like that, rustically beautiful, to the table, along with the blueberry compote. Just drizzle over the slices of the cheesecake as you hand them out.


Monday, 8 July 2024

Lemon Ricotta Cake


This lemon ricotta cake is light, fluffy and full of flavour, it is the perfect Italian dessert. Easy and simple recipe to serve with tea or brunch, then this easy Lemon Ricotta Cake is for you. Moist and tender from loads of whole milk ricotta cheese in the batter, this thick cake is best without any extra frosting or fuss.
Trust me, this cake is anything but boring. It may not blow anyone away visually, but the taste and texture of a ricotta cake is incomparable to anything else. This version has hints of lemon while being both fluffy and rich.
Dense yet super moist, this Italian lemon ricotta cake is the type of sweet ending to close out an epic brunch. Just dust with icing sugar and you are set!

Ingredients:
  • 120g butter, soft at room temperature
  • 120g caster sugar
  • 3 tsp lemon zest
  • 60ml lemon juice
  • 250g full fat ricotta cheese
  • 3 large eggs, room temperature
  • 1 tsp vanilla extract
  • 200g plain flour
  • 1½ tsp baking powder
  • ½ tsp baking soda
Method:

Preheat the oven on 180ºC/160ºC for fan assist oven. Line the bottom of a 9 inch springform pan with baking paper and lightly grease the sides of the pan.

In a large bowl, cream together the butter, sugar and lemon zest on medium to high speed for 3-5 minutes.

Add the ricotta cheese and mix for a couple of minutes. Add the eggs one at a time,  mixing slowly until combined. Mix in the lemon juice and vanilla extract.

Sift in the flour, baking powder and baking soda. Slowly mix and stop as soon as combined to avoid overworking the batter.

Transfer into the springform pan. Use a spatula or the back of  spoon to spread and smooth out the batter if needed.

Bake for 35-40 minutes or until a skewer comes out clean. Leave to cool down completely before removing from the pan.

Optional; to finish the cake, dust it with a little bit of icing sugar and zest of lemon.

Enjoy!!!