Tuesday, 23 April 2024

Lemon Ricotta Cheesecake


This baked Lemon Ricotta Cheesecake is rich, creamy, fluffy and sunshiny sweet. So, if you love lemon and cheesecake, you have to try this ricotta cheesecake recipe!
This wonderful baked cheesecake recipe, using ricotta cheese, cream cheese and yogurt. One of the reason is it gives a fluffier texture to the cheesecake and doesn't make it quite as heavy to eat.


Ingredients:
  • 380g cream cheese, room temperature
  • 500g ricotta
  • 4 eggs, lightly beaten
  • 200g castor sugar
  • 330ml plain yogurt
  • 3 lemons, juice and zest
  • 4 tbsp cornflour
For the topping:
  • 2 tbsp lemon curd
  • 1 cup double cream for decorating on top or serving, whipped until stiff
  • some grated white chocolate
Method:

Preheat oven to 170ºC. Line and base a 9 inch round springform tin with baking paper and grease the sides of the pan.

Also, wrap the bottom of the springform pan in aluminium foil so the foil also comes up the sides, like a coat. This will stop any water from seeping into the pan once it is in the water bath.

In a mixing bowl, add all the ingredients except the eggs, and beat until everything is combined and smooth.

Then slowly add the lightly beaten eggs, again, until everything is combined.

Transfer the mixture to the baking pan and using the tip of a knife, lightly swirl around to get rid of any bubbles you see.

Carefully transfer the cheesecake to a larger baking pan, and fill with water in it, just halfway up the outside of the springform tin.

This will allow the cheesecake to cook more slowly and evenly. Then place in the oven and bake for 45 minutes. There should be a slight wobble to the cheesecake and a little golden on the surface.

Once done, switch the oven off, and leave the cake inside wit the door closed for a further 60 minutes.

When the cake has fully cooled, place in the fridge to chill, preferably overnight, but at least 6 hours. 

Once firm, turn out onto a serving plate. It is easiest to keep the cheesecake in the baking tin in the fridge until completely set and then remove the outer ring and place a plate on top of the cheesecake and turn upside down, then remove the cake pan base and baking paper.

When chilled, you can decorate the top with the whipped cream. Heat the lemon curd for 30 seconds in the microwave to loosen up and then drizzle over the top. Sprinkle with some grated white chocolate or leave it out to suit!


Thursday, 18 April 2024

Shortbread Lemon Bars


Perfect for potlucks, picnics or just a quiet afternoon tea, these lemon bars with buttery shortbread crust and luscious lemon filling are as pretty as they are delicious!
Beautiful. Elegant. Impressive.
LOVE the lemon curd!. Jammy, a bit custardy, tangy and not-too-sweet. Hits the spot!


Ingredients:

Crust:
  • 175g plain flour
  • 95g granulated sugar
  • 115g butter, cut into cubes, room temperature

Lemon Filling: 
  • 3 large eggs, room temperature
  • 120g granulated sugar
  • 80ml lemon juice
  • 2 tsp lemon zest
  • 30g butter, melted and cooled
  • 10g plain flour
  • icing sugar for coating the bars
Method:

Preheat the oven to 175ºC. Grease an 8 inch square oven-proof dish and line the bottom and sides with baking paper, about 2 inches of overhand on each side. 

Crust: Mix the flour and sugar in a medium bowl. Add in the cubed butters and cut butter into flour mixture with a fork. Alternatively, you can rub the butter and flour mixture with your fingertips. The mixture will look like breadcrumbs.

Spread the mixture into the oven proof dish with your hand. You can use the back of a spoon to spread it evenly. You should lightly flour the spoon to avoid it sticking to the flour-butter mixture.

Bake for 25 minutes until it is golden brown. For a soft crust, bake for 22 minutes or until it lightly changes colour.

Lemon filling: Mix the lemon zest and sugar in a bowl with a fork or rub with your fingertips to increase the lemon flavour. Add in the eggs and whisk until well combined. Then add the cooled melted butter, lemon juice and mix. Add in the flour and mix until all incorporated.

Add the lemon filling to the hot crust. Bake for 12-15 minutes until the filling is set but still soft. Remove from oven and let it cool at room temperature for about 1½ hours. When it is cool enough, lift the paper from the sides.

Cut into 9 squares. Dust with icing sugar. These bars can last for a week if you keep in the fridge. 


Tuesday, 16 April 2024

Chicken Karahi


Karahi is named after the pan in which it was originally cooked-a heavy, often cast-iron pan that is similar to a wok, but rounder with a flatter base. Traditionally, meat would be simmered and stir-fried in this karahi in an open fire.
Chicken karahi distinguishing features are it's rich, tomatoey base and a fragrant finishing of green chili peppers, coriander and silvers of ginger.


Ingredients:
  • ¼ cup of cooking oil or ghee
  • 600g chicken breast, cut into bite pieces. You may use any part you prefer
  • 500g tomatoes, finely chopped
  • 5 cloves of garlic, minced
  • 2 tbsp minced ginger
  • salt to taste
  • 2 tsp paprika or kashmiri red chili
  • 1 tsp crushed black pepper
  • 1 tsp chili flakes
  • ½ tbsp cumin powder
  • ½ tbsp coriander powder
  • 2 green chillies, slit in half lengthwise
  • handful or coriander, chopped
  • ¼ cup ginger cut into fine matchstick pieces
Method:

Heat the oil in a pan, (or a karahi wok if you have) on high heat.

Add the chicken and stir the chicken constantly until he chicken begins to take on golden colour in some places.

Add in the minced ginger and garlic. Give this a fry alongside the chicken, again stirring constantly and ensuring nothing burns. Continue to fry this until the raw smell of the ginger and garlic begins to fade.

Add all the chopped tomatoes and spices. Stir in and allow this all to cook on high, stirring to ensure nothing catches at the bottom of the pan.

Continue to cook this for 15 minutes, over high heat. The oil will separate, the tomatoes will thicken and begin to coat the chicken, and you will see holes begin to bubble in the gravy. The chicken should be cooked through at this point once the oil rises to the top and you see the holes coming through.

Add the coriander and green chillies, stir in, turn the heat down to a low heat and allow everything to simmer together for 5 minutes with the lid still off.

Serve with the matchstick-cut ginger and additional coriander/green chilli if desire. Goes well with hot rice!


Lemon Marmalade


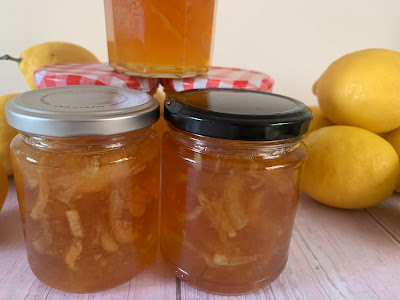
Recently, my friend came back from his holiday in Spain where he rented a house there for 3 months during the winter month. There are orange tree, lemon tree and also an avocado tree, and the trees are full with fruits. So, just before he left his rented Air B&B, I told him to get me some beautiful, homegrown lemons from the garden, in which to my surprise he brought back a big bag of lemons. I have been baking all sorts of cakes & desserts using the lemons. I still need to find how I can use up most of the lemons before they get rotten.

I spend a bit of time trawling online sites before deciding that the best thing would be to have a go at making some lemon marmalade. If you think that making a marmalade is difficult, I want to assure you that it is easier than you may think. So, here its the recipes.

Ingredients:
  • 500g unwaxed lemons
  • 6 cups water
  • 1.5kg sugar
Method:

Place a saucer or a small plate in the freezer, ready to check for the setting point of your marmalade.

Thoroughly wash the lemons. Remove each end of the lemons. Remove each end of the lemons and cut the lemons into quarters lengthways. Holding two of the quarters together, slice as thinly as possible and remove any seeds.

Place the lemon slices into a non-reactive bowl. Add the 6 cups of water, cover the bowl and leave the lemons to stand overnight.

The following day, place the lemons and water into a jam pan. Over medium-high heat, bring the fruit and water to boil. Boil for about 15 minutes or until the lemon peel is tender, stirring occasionally with a long-handled wooden spoon. The time may vary slightly depending on the variety of lemon and the thickness of the slices.

Add the sugar and stir well to dissolve it. After dissolving the sugar, return the fruit to the boil, stir occasionally and skim to remove any foam. Continue to stir until the marmalade reaches setting point, about 25 minutes.

Remove from the heat to conduct the wrinkle test. If not set, continue to boil for another 2-3 minutes and then test again. The "wrinkle test" is by putting a small amount of the marmalade onto the saucer that you taken out from the freezer. Let it cool for a minute then push against the marmalade with the tip of your finger. If the surface wrinkles it means setting point has been reached. 

Take the mixture off the heat and let the marmalade stand for about 10 minutes. This will help evenly distribute the fruit throughout the jars.

Ladle the marmalade into sterilized jars. It's ready to give as gift to family and friends.


Chocolate Brownie Cake


This chocolate brownie cake is one of the easiest chocolate cake I have ever made, but also one of the most delectable!! I found this recipe from cupcakessavvykitchen. It's decorated with luxurious Kinder Bueno buttercream and chocolate sauce.

Ingredients:

Fudge brownie layers:
  • 115g butter, melted
  • 1 cup sugar
  • ½ cup cocoa powder
  • 1 tsp instant coffee granules
  • 3 tsp vanilla extract
  • 2 large eggs
  • ½ cup plain flour
  • ¼ tsp baking powder
  • pinch of salt
Kinder Buttercream:
  • 250g butter, softened at room temperature
  • 200g sweetened condensed milk
  • 2 Kinder Bueno chocolate bars
  • ¼ cup milk
Chocolate Sauce:
  • 1 cup dark chocolate
  • ½ cup double cream
Method:

Preheat the oven to 180ºC. Grease and line an 8 inch square baking pan with baking paper.

For the fudge- In a mixing bowl, add the melted butter. Sift cocoa powder over the butter. Add sugar, vanilla, coffee granules and eggs to the mixing bowl. Mix well with a hand whisk until the batter is smooth and glossy.

Sift in the flour, baking powder and salt. Gently mix with a silicone spatula until just combined, scraping the sides and bottom of the bowl. Avoid over mixing.

Pour the batter into the prepared pan and bake for 15-17 minutes. 

Allow to cool in the pan on a wire rack for 10 minutes, then remove and cool completely. Trim the edges of the brownie and cut into two equal size.

For the Kinder Bueno buttercream: Place the Kinder Bueno bars and milk into a bowl suitable for a stick blender, a food processor or a regular blender. Blend thoroughly to break up the wafers and chocolate.

Once blended, set the mixture aside in a small bowl for 5 minutes, allowing the wafers to soften and the mixture to thickens as the wafers absorb some of the milk.

In a medium-sized mixing bowl, add the softened butter. Using a hand mixer, beat the butter for 5 minutes until it becomes light and fluffy.

Add the condensed milk to the whipped butter. Continue to mix for 3 minutes until the mixture is well blended. make sure to scrape the bottom and sides of the bowl to ensure everything is combined.

By now, the Kinder Bueno mixture should be ready. The wafers would have softened. and the mixture thickened. Add this mixture to the buttercream and mix for an additional 2 minutes or until well blended. 

Set aside until ready to use when assembling the brownie.

To assemble the brownie: Place one brownie layer on a serving plate. Pipe two to three rows of ruffle swirls using the Kinder Bueno buttercream and a 1M piping tip.

Gently place the second brownie layer on top.

Pipe three rows of the ruffled buttercream along the top of the cake.

Chocolate sauce:  Combine the chocolate and cream in a microwave safe jug. Microwave in 30 seconds intervals, stirring between each until smooth.

Cool for 5 minutes before using.

Garnish: Drizzle the chocolate sauce over the cake, allowing it to drip down the sides. Top with mini Kinder Bueno chocolates. 

Refrigerate until ready to serve.


Saturday, 6 April 2024

Tomato Soup with Mexican Bean


This rich, hearty and loaded with vegetables makes this spicy Tomato Soup with Mexican Beans one of the best comfort foods on a cold day. 
This soup is packed with protein loaded veggies and is not overly spicy. Overall, this is a delicious, heathy soup and you might want to make some extra as seconds are always requested.

Ingredients:
  • 3 tbsp cooking oil
  • 1 red onion, finely chopped
  • 1 tbsp freshly grated ginger
  • ½ tbsp chili powder, or according to your spice level
  • 1 tsp ground cumin
  • 2 tsp ground coriander
  • 2 carrots, peeled & grated
  • 3 celery ribs, chopped
  • 1 can of chopped tomato
  • 3 large potatoes, peeled & diced
  • 3 cups chicken stock
  • 1 can butter beans, drained & rinsed
  • 1 can red kidney beans, drained & rinsed
  • salt to taste
  • some chopped coriander
Method:

Heat the oil in a large pot and sauté the onion for about 3 minutes. Stir in the garlic, ginger, chili powder, cumin, coriander and carrots. Stir fry for about 5 minutes.

Add the can tomato, chicken stock and potatoes. Reduce the  heat and simmer, covered for about 10 minutes. Then ass in the celery. Continue simmer until the vegetables are nearly cooked.

Add in the butter beans, kidney beans and salt and continue cooking until all the vegetable are soft and cooked through.

Stir in the chopped coriander and enjoy!!