Showing posts with label Chinese. Show all posts

Tuesday, 11 February 2025

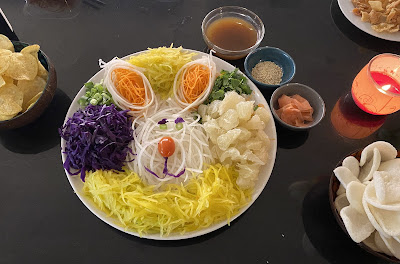
Snake-shaped Yee Sang


 Yee Sang is a festive dish made for Chinese New year. As this year is the year of snake, I shapes my Yee Sang in the shape of a snake!!! Even I am so afraid for them. It's a raw fish salad that symbolizes good fortune, abundance and prosperity. You may omit the raw fish is your have vegan guest.

Design: Snake-shaped to symbolize longevity and good luck
Ingredients: Fruits (mango, pamelo), vegetables (carrots, moolie, purple cabbage, spring onions, corianders, kaffir lime leaf) crunchy toppings (wontan skin, peanuts, sesame seeds)
Dressing: Plum sauce, sesame oil, honey, apricot jam, lime or lemon juice, 
Toss: The prosperity toss (Lo Hei) where everyone tosses the ingredients in the air and shouts auspicious wishes!

Saturday, 11 January 2025

General Tso's Chicken


It is said to originate from Hunan province of China and is named after a well-respected Chinese military, General Tso. While the accuracy if either of these statements is questionable- and in fact, rumour has it that it was brought into US by Taiwanese chefs!
General Tso's Chicken is saucy, juicy and crispy. The signature sauce is thick and loaded with flavour. If you are a die-hard orange chicken fan, you must try this dish! Make it all in one dish in the comfort of your home for a sweet and spicy treat! I like to add crunchy broccoli to this dish.

Ingredients:
For the chicken:
  • 450-500g chicken thighs, breast or mini fillet, cut into bite pieces
  • 1 tsp Shaoxing wine
  • 1tbsp water
  • ¼ tsp salt
  • ¼ tsp white ground pepper
  • 1 tsp sesame oil
  • 1 tsp toasted sesame seeds
  • 1 tbsp plain flour
  • ¼ cup corn flour
For the General Tso's sauce:
  • 1/3 cup chicken stock
  • 1 tbsp dark soy sauce
  • 1 tbsp light soy sauce
  • 3½ tbsp brown sugar
  • ½ tsp rice wine vinegar
Stir fry sauce & garnish:
  • 2-3 cups broccoli florets
  • cooking oil, enough o deep fry the chicken
  • 2 cloves garlic, minced
  • 5-6 dried red chili
  • 2 tsp Shaoxing wine
  • 2 tbsp corn flour, mixed with 2 tbsp water
Method:

Marinate the chicken pieces in a bowl with Shaoxing wine, water, salt, white pepper and sesame oil. Mix until the chicken absorbs all the liquid. Next, add the toasted sesame seeds, plain flour and corn flour. Stir to coat, and set aside.

Make the sauce mixture by combining the chicken stock, dark soy sauce, light soy sauce, brown sugar and rice wine in a bowl. Set aside.

Boil enough water to blanch the broccoli for 30-60 seconds, depending on whether you like the broccoli soft or crunchy. Drain and set aside. To keep it super green, you can also transfer the broccoli to an ice bath and then drain and set aside.

Heat the frying oil in a small but deep pot. Make sure the oil is hot enough for frying by sticking the end of a wooden spoon or a wooden chopstick into the oil. If you see many bubbles form around the wood and they start to float up, your oil is ready for frying.

Carefully drop the chicken pieces into the oil in small batches. Make sure the batter/sesame seeds have really coated all the sides of the chicken before frying. The chicken should have float at the top of the oil. Fry until light golden brown  and transfer to a wire rack to drain.

Once all the chicken has been fried once, fry the chicken a second time for 3-5 minutes until crispy. Be careful not to burn it.

Heat a clean wok over medium heat. Add 1 tbsp of oil along with dried chilies. Cook the chilies for about 10 seconds. Add the minced garlic and Shaoxing wine.

Next, add the General Tso's Chicken sauce you prepared. Bring the sauce to a simmer, and then stir in the corn flour mixture until the sauce thickens to a glossy sauce. Add the chicken and broccoli, and toss until everything is coated in the sauce. Plate and serve immediately with steamed rice!

Enjoy!


Friday, 27 December 2024

Chinese Pastry Roast Pork Puff


Char Siu Sou is the most common dim sum savoury pastry. Between its slightly sweet pork filling, flaky crust and the sprinkling of the sesame seeds on top, these adorable little packages are an instant favourite!
Imagine taking a bite, and the crust literally shattering in your mouth. Char siu sou are usually shaped into triangles in dim sum restaurants, but shaping them into rectangles or squares as I do is easy and tastes exactly the same.


Ingredients:

For the filling:
  • 300g pork, dice into small pieces
  • 1 small onions diced
  • 2 tbsp oil
Seasoning: 
  • 1½ tbsp light soy sauce
  • 1½ tbsp oyster sauce
  • 1 tbsp dark soy sauce
  • 1 tbsp sugar
  • ½ tsp sesame oil
  • ¼ tsp pepper
  • 1 tbsp cornflour +¼ cup water, combine well
  • ¼ cup frozen green peas
For the pastry:
  • 1 roll shop bought puff pastry
  • egg wash, 1 egg beaten + 1 tbsp water
  • 1 tbsp sesame seeds
Method:

For the filling: Heat the oil in a non-stick pan, fry onion until soft then add in the pork and seasoning. Cook until the pork is tender. Add in the corn flour mixture. Toss well to mix. Add in the green peas ans mix well. Dish out and leave aside to cool before use.

Assemble the puff: Preheat the oven to 200ºC/180ºC for fan-assist oven. On a lightly floured surface, roll out the puff pastry. Cut into equal squares, what ever size you prefer. 

Put about 1½ tsp of the filling onto a pastry square and brush the edges with egg wash. Cover with another pastry square and use a fork to crimp it closed. Make sure they are tightly sealed. Repeat until all the filling and the pastry has been used.

Brush the tops of the pastry with egg wash and sprinkle with sesame seeds. Bake for 18-20 minutes, or until puffed and golden brown. Serve warm!

Sheng Jian Bao (生煎包)


Sheng Jian Bao (生煎包),or known as raw fried bun in English is an ordinary street food snack you can find all over Shanghai, Hong Kong & Macau. By "raw", it means you pan fry the buns without steaming them first, in which process the dough will rise and the bottom crisp up at the same time. The pan fried pork bun is different from steamed stuffed buns also known as baozi, which is steamed only.
Truly fresh and super tasty, they are simply irresistible! The wrapper has a lovely soft texture with a golden, crispy base. The filling is very flavoursome and moist.
Tasty, moist pork wrapped with half-soft, half-crispy dough, Shanghai pan-fried pork bun, traditionally served as breakfast, make a great party food!

Ingredients:

For the wrappers:
  • 250g plain flour
  • 1 tsp sugar
  • 1 tsp dried instant yeast
  • 140ml lukewarm water
For the filling:
  • 250g minced pork
  • 2 tbsp spring onion, finely chopped
  • ½ tbsp ginger, minced
  • 2 tsp light soy sauce
  • ½ tsp Shaoxing rice wine
  • ½ tsp sesame oil
  • ¼ tsp salt
  • pinch of Chinese Five Spice powder
  • 5 tbsp water or chicken stock
For garnishing:
  • toasted sesame seeds
  • spring onion, finely chopped
Method:
 In a large bowl, mix flour, yeast and sugar. Pour in water little by little while stirring with a pair of chopsticks or fork.

Then knead with your hand until a smooth, elastic dough forms. You may also use a stand mixer with a fitted dough hook. Put all the ingredients into the mixing bowl. Knead for 5 minutes or so on lowest speed. Cover the bowl with a wet kitchen towel.

Leave it in a warm place until double in size. It will take between 40 minutes to 1½ hours depending on the room temperature.

Mix the filing: Put all the ingredients for the filling, except for water and stock, into a large bowl.

Swirl constantly in the same direction while gradually adding water/stock spoon by spoon into the mixture.

Shape the buns: Knead the dough on a floured work surface until it goes back to its original size. Divide it into 20 equal portions. Roll each piece into a disk-like wrapper.

Hold the wrapper in the palm of one hand. Place some filling in the middle. Use the other hand to fold the edge anticlockwise by pinching with thumb and index finger until the bun is completely sealed.

Leave to rest for 15 minutes before frying.

Fry the buns: Heat up oil in a frying pan over a high heat. Place in the buns.

When the bottom part becomes golden brown, pour in the water then cover with a lid.

Uncover when the water evaporates completely. Sprinkle sesame seeds and spring onion over.

Cook another 30 seconds or so to crisp up.

Thursday, 24 October 2024

Chicken And Broccoli With Brown Sauce


Chicken and Broccoli with brown sauce  is a a popular Chinese takeaway dish. Skip the takeaway and make this dish at home. It is easier to make than you might think, and tastes even better than your local restaurant or takeaway. This healthy version of takeaway favourite combines chicken, super healthy broccoli, garlic and ginger for a delicious, weeknight dinner. 


 Ingredients:
For the chicken:
  • 350g skinless chicken breast or thighs
  • 3 tbsp water
  • 1 tbsp oyster sauce
  • 1 tsp cornflour
  • 1½ tsp vegetable oil
For the sauce:
  • 2/3 cup chicken stock
  • 1½ tbsp soy sauce
  • 2 tsp dark soy sauce
  • 1 tbsp soy sauce
  • 1 tsp sesame oil
  • a pinch of white pepper
  • 300g broccoli
  • 3 tbsp cooking oil
  • 2 cloves garlic, minced
  • ¼ tsp fresh grated ginger
  • 1 tbsp Shaoxing wine
  • 2 tbsp cornflour, mixed with 2 tbsp water
Method:

Slice the chicken into bite-size pieces. In a bowl, add the sliced chicken, 3 tablespoon water, 1 tablespoon oyster sauce, t teaspoon cornflour and 1½ teaspoons vegetable oil. Rub the marinated ingredients into the chicken with your hands until all the liquid has been absorbed by the chicken. Set aside for 10 minutes.

Next, prepare the sauce mixture. In a small bowl or measuring cup, add the warm chicken stock, sugar, soy sauce, dark soy sauce, oyster sauce, sesame oil and white pepper. Stir everything together until well combined and set aside.

Boil water in your work and blanch the broccoli for 1 minute or 2 if you like your broccoli softer. Drain and set aside.

Clean and dry your wok. Place it over high heat until smoking. Add 2 tablespoons vegetable oil and sear the chicken until opaque on all sides (this should only take about 3 minutes). Turn off the heat, remove the chicken, and set aside. The chicken will be about 90% done, but will be cooked again at the end.

Without washing the wok, set the heat to medium high. Add another tablespoon of oil, along with the garlic and ginger. Stir the garlic and ginger for 5 seconds and add the Shaoxing wine around the perimeter of the wok. Then pour in the sauce mixture. use your wok spatula to stir the sauce around the sides of the wok to deglaze, and let it come to a simmer.

Stir up the cornflour and water and drizzle the mixture into the sauce while stirring occasionally. Allow the sauce to simmer for 10-15 seconds until thick and gravy-like.

Toss in the chicken and its juices and the blanched broccoli. Stir-fry until the chicken and broccoli is coated in the sauce.

At this point, you can make adjustments. If you like your brown sauce darker, add a dash more of dark sauce. Add  more cornflour if your sauce is too thin, or more chicken stock or water if the sauce is too thick. Serve with steamed rice.

Monday, 13 November 2023

Longevity Peach Buns (ShouTao Bao 寿桃包)


A soft fluffy basic steamed bun is shaped into a peach shape and can be filled with a sweet filling of your choice is popular in the Chinese culture to represent longevity.

Shou means longevity and tao means peach. Why peach? It was back in the ancient times when the immortals have been given peaches that promise longevity. It was called peaches of immortality and to this date, the peach has been used as the symbol of longevity. So it is not uncommon to see fresh peaches or longevity peach steamed buns are gifted as birthday presents in the Chinese culture.


Ingredients:

For the bun dough:
  • 300g plain flour
  • 30g castor sugar
  • 1 tsp instant yeast
  • 170ml cold milk/water
  • 8g vegetable oil
Colouring:
  • tea strainer
  • toothbrush
  • 2 tsp water+ 2 drops pink colouring, for the buns
  • green food colouring, for the leaves.
For the filling:
  • 360g red bean paste, black sesame paste or any filling you like. You can buy ready made filling from Oriental shop or you can make the filling yourself.  Divide in 30g each ball. 
Method:

For the filling: It will be easier to handle the filling when it is chill. Roll into a balls of about 30g each balls. I place them in the freezer while making the bun dough.

For the bao bun: In a large bowl, mix in the cold milk along with instant yeast and sugar. Stir well until the sugar is completely dissolved.

Add in the flour and mix everything together, gather all small crumbs until it creates a dough ball. 

Pour in the vegetable oil. It seems too much oil at first, collect all the oil in the bowl, and then continue kneading on a work surface for about 1 minutes. When you feel that the oil started to absorb completely, roll the dough into a long shape (like sausage). Then take left and right ends and fold it to the centre of the dough (repeat the same process for 2 times). The dough gradually will become really smooth. Do not overwork, this kneading process will only takes about 3-4 minutes.

Once the dough is ready, you can use it immediately. There is no need to rest the dough because by proofing it twice, it will cause a lot of air bubbles on the surface.

To fill & shape: Reserve 40g of the dough for the peach leaves and divide the rest into 12 equal pieces (about 45g to 48g each). Always cover the bun with a cling film to prevent from drying out.

Take 1 portions of the dough, press into a thick disk. Using a rolling pin, roll back and forth onto rectangular shape, fold into 2 equal shape pieces, turn 90º angle and repeat the same process 2 times. 


Then roll the dough into a square shape, grab the dough with left hand and rolling pin on the other hand. Using the rolling pin, roll up and back flatten the edges of the dough while turn the dough a little by little (middle part should be slightly thick).

Place 1 portion of the red bean paste filling to the centre of the dough, gather the sides to enclose the bun and pinch to seal.

To shape the bun into peaches, flip the filled bun so the seam side is down and shape it to a smooth oval ball. Using your palms, form a peak on the top. To make the seam of the peach, gently press the bench scrapper in to create a line along the arch; pinch the top, mimicking the shape of the peach.

Cover the filled buns with a cling film and repeat this process with the rest of the dough and fillings.


For the bun leaves:
Colour the 40g left over dough with green food colouring and divide it into 24 equal pieces. (about 2g each). Using bend scraper, flatten the cone. Form a line in the centre and create the leaf vein patterns tilts towards the cone.

Colour & decorate the bun: To create the pink shades of the buns, simply mix some water with a few drops of pink food colouring.  Dip the toothbrush to the colouring mixture, tap off any excess onto a kitchen paper.

Hold the strainer upside down 2-3cm above the bun, the gently brush the toothbrush over the back of the strainer in a circular motion; repeat the same process until you get the desire colour shades.


Attached the leaves onto each peach bun with a ab of water, a pair for each bun. Place each bun onto a piece of baking paper.


Proof & Steam: Place the finished bun in the steamer; make sure you give some space in between the buns so they won't stick one another after fermentation or steaming. Cover and allow to rise for about 30 minutes to an hour depending on the temperature in the house.

After fermentation, the proofed buns should feel lighter and rise about 50% of their original size. If you gently press it with your finger, the dough will make a indentation and be able to slowly bounce back into shape.

Over medium high heat, steam the buns for 10-15 minutes. After 10 minutes, take the streamer off from the heat, DO NOT OPEN the lid and let it sit for another 5 minutes. If you open the lid immediately, the skin of the bun will get wrinkly.

Serve !

Sunday, 19 February 2023

Vegan Steam Vegetable (Bangkuang) Bao


Bāozi包子 are a very popular Chinese breakfast item. These buns usually present themselves as sweet or savoury fillings wrapped in a dough and also it is one of the popular street foods in China or Southeast Asia. 

Surprisingly, steam bao find its origin in the 2nd century, when this food was much simpler. Over the course of history, steamed baos have witnessed many changes, which leads to the diversity of this traditional Chinese delicacy. Today, you can find bao in different sizes, shapes and with various stuffing.

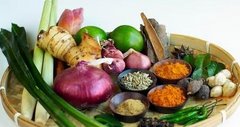
Today I decided to make a vegan vegetables bao using bangkuang (know in Malaysia) Bangkuang/ sa kot/ yam bean/ jicama is a tuberous root native to Mexico. The Spaniards spread its cultivation to Philippines, and from there it went to China and other parts of Southeast Asia. It is sweet with a crisp texture and yellow papery skin. It is commonly eaten raw in salads such as Rojak and Yee Sang. It is an essential ingredients in Jiu Hu Char or Popiah. That is how bangkuang look like as below photo.


For the filling:
  • 750g coarsely shredded bangkuang/jicama/yam bean
  • 200g coarsely shredded carrot
  • 5 dried shitake mushroom, soaked to softened and cut into small pieces
  • 2 pips garlic, finely chopped
  • 3 stalks of fresh coriander, finely chopped
  • 2 tbsp sesame oil
  • 3-4 tbsp vegetarian oyster sauce
  • 2 tbsp light soy sauce
  • 1 tbsp sugar
  • 1 tsp white pepper
  • 2 tbsp cooking oil
  • salt to taste
Method:

For the filling: Heat 2 tbsp cooking oil, add in the garlic and fry until fragrant, then add in the carrots. Stir for 1-2 minutes. Add in the bangkuang and continue frying for another 2 minutes. 

Add in the oyster sauce, light soy sauce, sesame oil and salt. Mix well and add in about ¼ cup water and bring to boil. Once boil, let it simmer until soft and nearly dry. Just before taking the fillings off the heat, add additional seasoning such as white pepper, salt and sugar. Make sure you are slightly heavy handed adding in the seasonings because it will be eaten with steamed buns which is plain.

Transfer the cooked fillings to a bowl. Leave it aside to cool completely before filling the bun.

To fill the bun, shape the dough into round shape using a rolling pin. Put the dough on your hand or on top of the table. On the top of the dough, put 1-2 tbsp of the cooked fillings. Pull up the sides of dough and seal off the edges with your fingers. Well seal needed so that the fillings do not burst out from the dough.

Put the buns on top of a square baking paper on top of the steamer rack. Leave space of about 1.5cm between the dough for expansion. Proof the dough for another 30 minutes or almost double in size. By the end of the second proofing, you will notice that the dough skin become smoother as compared to before proofing. 

After the second proofing, get ready the steamer with some water. Bring to boil. When the water boils, steamed the buns under high heat for about 15 minutes. After 15 minutes, off the heat and let the buns sit in the steamer, without opening the lids for about 10 minutes before transfer the buns out of the steamer. The process of letting the buns sitting in the steamer is to prevent wrinkles and rough surface appearing in the buns. Put the buns in cooling rack.

Best served warm as breakfast or snack items. Re-steam the buns for 3-4 minutes will make the buns soft as if they are freshly prepared.


Lion's Head Meatballs (獅子頭 Shi Zi Tou)


 With the grand and exotic-sounding name, you would think the Chinese meatballs known as "Lion's Head"( 獅子頭 Shi Zi Tou ) would be troublesome to make at home. Fortunately, they are as easy as can be. A Shanghai speciality, Lions Head meatballs are made of simple, humble ingredients.

You will find quite a few versions of Lion's Head in China. One popular rendition in northern China is braised meatballs, which are braised in a soy-sauce-based liquid after browning. Another type is meatballs cooked in chicken broth. 

What are Lion's Head Meatballs?
Lion's Head meatballs (獅子頭 Shi Zi Tou) are large pork meatballs that steamed/braised and served with vegetables. Their name derives from their shape, which resembles the head of a Chinese guardian lion, or foo dog. It can be eaten anytime of the year, but is often served as a celebration dish!

Ingredients:
  • 450g ground pork/chicken
  • 10g ginger, minced
  • 1 spring onions, finely chopped
  • 1 large eggs
  • 3 tbsp plain breadcrumbs
  • 1 tbsp Shaoxing wine
  • 1 tbsp light soy sauce
  • 1 tbsp oyster sauce
  •  ½ tsp white pepper
  • ¼ five spice powder
  • 1½ tsp corn flour
  • ¼ cup water
  • 100g water chestnuts
For the sauce:
  • 1 tbsp cooking oil
  • 4 slices ginger
  • 2 spring onions, cut into 2 inch lengths (separate the white and green)
  • 2½ tsp brown sugar
  • 1 tbsp Shaoxing wine
  • 1½ tbsp light soy sauce
  • ¼ tsp dark soy sauce
  • 1 tbsp oyster sauce
  • 1½ cups water
  • 1 tsp corn flour, mixed with 1 tbsp water
  • ¼ tsp sesame oil
  • bok choy for serving
Method:

For the meatballs: Put the ground pork/chicken in a large bowl. Add the minced ginger and spring onions, egg, breadcrumbs, Shaoxing wine, light soy sauce, oyster sauce, white pepper, five spice powder, corn flour and water.  Whip everything in one direction for about 10 minutes, until the meat mixture resembles a paste. This step is important to making sure the meatballs have the right texture and don't fall apart during frying.

Finely minced the water chestnuts and add to the meat mixture and continue to mix everything together for further 5 minutes. Use a spatula to scrape everything together.

Heat enough oil to submerge the meatballs in a small, deep pot (small pot requires less oil) to about 175ºC. Make sure there are enough oil to cook the meatballs evenly.

With oiled hand, divide the meat mixture into 8-9 equal portions and shape each into a ball. Carefully lower the meatballs one at a time into the heated oil, and fry in batches until the meatballs are evenly golden brown. Remove the par-cooked meatballs with slotted spoon and set aside.

For the sauce: Heat 1 tbsp oil in a wok over low heat. Add the ginger and white parts of the spring onions and cook for 1 minute. Then add the sugar and cook until dissolved.

Add 1 tbsp Shaoxing wine, 1½ tbsp light soy sauce, ¼ tsp dark soy sauce, 1 tbsp oyster sauce and 1½ cup water. Stir and bring the liquid to a boil.

Once boiling, add the fried meatballs. Cover and cook for about 15 minutes over medium/low heat, flipping the meatballs halfway through.

After simmering, there should be about ¾ cup liquid left. Remove the meatballs from the liquid and arrange on your serving plate. I served mine with blanched baby bok choy. Just add 1 tsp oil to boiling water for the shinny look, and blanched for 30 seconds.

Mix your corn flour mixture, and pour into the sauce to thicken. Once it is thick enough to coat the back of a spoon, stir in ¼ tsp sesame oil and the green part of the spring onions. Once the spring onions are wilted, drizzle the sauce over the meatballs.

Sunday, 29 January 2023

Bunny Red Bean Bao Buns


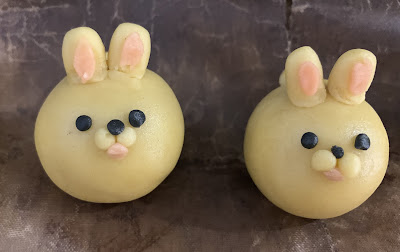
To usher the Year of the Rabbit, I decided to make my bao buns in the shape of a bunny! Bunny Bao Buns!! These vegan bunny-shaped boa buns are ridiculously fluffy, soft, shinny and sooooooo cute.


The dough can be all be mixed into one bowl which is the best. And great news is no hand muscles needed to make this delicious bao buns, all just mix in a cake mixer. 
If you want to make a plain boa buns, you can go ahead and divide and shape the dough into a ball, let it rest and then steam. However, if you want to make a bunny shaped like this, have pink and black good colouring on hand!
You only need a little dough for the pink and black details. I then divided the remaining dough for 30g each balls. Once I had all my dough separated out, I lightly covered them with a tea towel to avoid them from drying out while I shaped each bunny.
You can make it a plain buns. I like mine filled with shop bough red beans paste. You can find the paste in any Asian shop.

 For the ingredients and method on how to make the buns but not shaping, following the link below:


To assemble the bunny:

To make the bunny ear and eyes, once the dough is all ready mixed, pinch about 25g for the plain dough and add the pink colouring to the dough and mix well. 

Again take about 10g of another plain dough and add the black colouring and mix well. Set aside separately both the pink and black dough and cover with a cling film to avoid dryness.

Put the packet of the red bean paste in freezer for about 4 hours. This will make the paste much easier to handle. Then take about 15g to 20g and shape them into balls. You can also freeze the red bean balls for easy handling.

You should get about 14-15 plain dough balls. Flatten and shaped the balls into circles, with the outer edge thinner than the centre.

Place the red bean ball in the centre and encase the filling with the dough. Press and seal the dough well. Slightly elongate the bun into an oval-egg shape. Place seam-side down into a piece of baking paper.

Create a pea-sized pink ball, about 14-15 pink balls for the tail, another pea-sized of 14-15 pink dough for the ears (divide the dough into 2 to make a pair of ear) and a buckwheat-sized black dough balls for the pair of eyes. Adhere all pieces with a touch of water.

Allow to rise, covered, for 30 minutes.

Steam in a bamboo steamer for 10 minutes, and serve immediately.

Any leftovers can be stored in the fridge for 5 days, or frozen for 2 months.

Bunny shape Pineapple Tart


Why are Pineapple Tarts used in Chinese New Year?
Serving any kind of sweet dessert is encouraging during Chinese New Year because it symbolises bringing a sweet life into the new year. The Hokkiens also consider certain fruits auspicious, and they are particularly fond of pineapple, ong lai in Hokkien dialect,which literally means " fortune come".

What are Pineapple Tarts?
Pineapple tarts are addictive bite-sized buttery goodies filled with pineapple jam. Made with butter and egg yolk, melt-in-your-mouth texture which is loved by many Malaysians and Singaporeans.
Its jam is usually sweet yet tart, and often made with fresh pineapples.

Here is the link to my Pineapple Tart recipe.


Year of Rabbit Yee Sang


 Gong Xi Fa Chai!, Kiong Hee Huat Chai, Kong Hei Fatt Choy!, Selamat Tahun Baru China, Happy Chinese New Year, Xīnnián kuàilè, 新年快乐 !!!

Chinese New Year wouldn't be complete without a few key things; angpows, resplendent reunion dinner and of course, Yee Sang. Yee Sang is something that is uniquely Malaysian. 

Yee Sang, dubbed YuSheng or Prosperity Toss, is a common ritual done on Chinese New Year to signify an auspicious start to the year. Yee Sang is a type of salad that is traditionally prepared with raw fish, carrots, white radish, pickled ginger, pomelo, peanuts, sesame seeds, crackers, five spice powder, pepper, oil and plum sauce. Every ingredient represents prosperous meanings: pomelo and carrot for luck, white radish for promotion at work and fish for abundance. 

The dish is then assembled on a plate for the Prosperity Toss (lou hei) in which the vegetables are first beautifully laid on a plate, excluding peanuts, sesame seeds, crackers, powders, oil and sauce, which auspicious saying are uttered while the final ingredients are added. Then diners will toss the ingredients into the air with more auspicious wishes. This is why the dish's actual name is Lou Hei Yee Sang (捞起魚生) 

Where Did Yee Sang Come From?

Although instinctively one would assume Yee Sang comes from China, its current iteration that we all know so well was actually birthed in Malaysia itself. Legend has it that the original Yee Sang was created by Loke Ching Fatt, originally a Cantonese immigrant from China, in the 1940s who owned a small catering business called Loke Ching Kee in the sleepy town of Seremban. As Malaya was going through recovery from World War II, Loke decided to pivot his business by creating the Lo Hei Yee Sang, a dish was inspired by the Chinese celebration of Ren Ri (人日), the 7thday of the Chinese New Year, where humanity was created according to myth. As it was common for the Cantonese to eat raw fish on that day, Loke decided to create the dish we know and love today, taking some inspiration from not only Cantonese culture, but Teochew and Hokkien cultures which were prevalent in Malaya as well. The dish was also prepared intentionally ritualistic, ensuring that the flavour and colours are observed for the auspicious new year. In the past, Grass Carp (waan jyu, 鯇魚) would be used, where they would be starved for a few days to ensure all impurities are gotten rid of before slicing up for the preparation, however, today salmon would be the most common form of preparation.

Tuesday, 1 February 2022

"Tiger" Pineapple Tart


Gong Xi Fa Chai, Kiong Hee Huat Chai, Kong Hei Fatt Choy , Selamat Tahun Baru China, 新年快乐 !!! 

This is the first day of the lunar year of the Water Tiger. A Water Tiger year occurs every 60 year. The Tiger is known as the king of all beasts in China. The zodiac  sign Tiger is a symbol of strength, exorcising evils  and braveness.

Chinese New Year cookies are on another level these days; instead of simple tasting good, many of them are made to look aesthetically-pleasing, and each year brings new surprises with the rotation of the zodiac animals. I decided to try and make the Tiger design pineapple tart after browsing the web looking for ideas. And here you are I am presenting you a tiger-rific twist!

The Tiger Pineapple Tarts are basically your regular enclosed pineapple tart  ball but additional embellishments like ears and whiskers to create adorable feline faces. Though the designs might look simple, they are really time consuming!! Not forgetting the care required to create each tart ball! 

Below is the link for the traditional pineapple tart recipe.