Showing posts with label Celebration cake. Show all posts

Tuesday, 15 April 2025

Chocolate Mousse Cake


THREE LAYERS OF CHOCOLATE!! You can never goes wrong with chocolate. This cake starts with a homemade moist chocolate cake. Then a layer of whipped chocolate mousse and if that's was not enough, another layer of fudgy chocolate ganache on the top. It is finished off with fresh strawberries for a pop of colour and fruity flavour.  I made this decadent cake for my son & his girlfriend  join birthday celebration! So...if you have someone in your life that loves chocolate I HIGHLY recommend making this cake!

Ingredients:
For chocolate cake:
  • 115g plain flour
  • 40g cocoa powder
  • ½ tsp baking powder
  • ¼ tsp baking soda
  • ¼ tsp salt
  • 1 large egg, room temperature
  • 50g granulated sugar
  • 50g brown sugar
  • 110g vegetable oil
  • 200g milk
For Chocolate Mousse:
  • 400g double cream, divided into 200g +200g
  • 200g dark chocolate, finely chopped
For Chocolate Ganache Topping:
  • 180g double cream
  • 170g dark chocolate, finely chopped
Filling & Topping
  • 10-12 fresh strawberries, halved plus more for topping
Method:

For the Chocolate Cake: Preheat the oven to 175ºC/160ºC for fan assist oven. Set aside a 9" springform pan. It is not necessary to line the pan with baking paper but you can if you want to.

In a small mixing bowl, stir together the flour, cocoa powder, baking powder, baking soda and salt. Set aside.

In another large mixing bowl, add the egg, granulated sugar and brown sugar. Whisk together until well combined. Add the oil and whisk again until smooth and combined.

Add half of the flour mixture and mix until barely combined. Add half of the milk and mix again until barely combined. Repeat with the remaining flour and milk and mix until just combined into a thick but fluid batter.

Pour the batter into your springform pan. Bake for about 25-30 minutes or until the skewer inserted in the middle comes out mostly clean. Let the cake cool completely in the pan on a wire rack.

Once cooled, if your cake has domed, run an offset spatula around the edges of the cake. Release the cake from the pan. Use a serrated knife and a horizontal sawing motion to cut off the excess cake until you have a flat cake layer. Return the cake to the pan and reassemble the springform pan.

For the Chocolate Mousse: Place the chopped chocolate in a small heat-safe bowl. Set aside.

In a small pan, heat 200g of the double cream on medium heat until tiny bubbles start coming to the surface and it is beginning to simmer. You can also do this in a microwave. Pour the hot cream over the chocolate and let it sit undisturbed for 5 minutes. Stir the chocolate mixture until all the chocolate has melted and the mixture is smooth. If there are any still unmelted chocolate chunks, gently warm the mixture in the microwave with 10-15 second intervals or on a warming element on your stove. Set aside to cool while you whisk the cream.

In a medium mixing bowl, add the remaining 200g double cream. Use an electric hand mixer or whisk to whip the cream until it has becomes just barely soft peaks. Do not whip it further past this point or the mousse will become stiff and dry.

Add about 1/3 of the whipped cream to the bowl of chocolate ganache. Fold together with a spatula until combined. Transfer this mixture to the rest of the whipped cream. Fold together until combined and no streaks remain.

Arrange halved strawberries around the sides of the pan on top of the cake layer, pressing the cut edges to the pan. Transfer the mousse mixture to the pan on top of the cake layer. Use a spatula to spread the mousse into an even layer, making sure to get in between each strawberry. Finish by smoothing the top of the mousse as best as you can.

Cover and chill the entire cake in the fridge for at least 4 hours or overnight to allow the mousse to set.

Chocolate Ganache Topping: Place the chopped chocolate in a small heat-safe bowl. Set aside. 

In a small pan, heat the double cream on a medium heat until tiny bubbles start coming to the surface and it is beginning to simmer. You can also do this in a microwave. Pour the hot cream over the chocolate and let it sit undisturbed for 5 minutes. Stir the chocolate mixture until all the chocolate has melted and the mixture is smooth. If there are any still unmelted chocolate chunks, gently warm the mixture in the microwave with 10-15 second intervals or on a warming element on your stove.  Let the ganache cool slightly and thicken.

Pour the ganache on top of the cake. Use a spatula to spread it to the edges and smooth the top. Chill the cake in the fridge for another 30 minutes to allow the ganache to set before releasing the cake from the pan.

Decorate the top of the cake with strawberries before slicing. Run your knife under hot water and wipe dry before and in between each slice for clean cuts.


Saturday, 20 July 2024

Vegan Chocolate Cake with Peanut Butter Buttercream and Chocolate Ganache


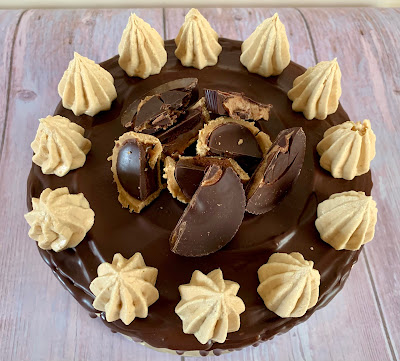
This decadent vegan chocolate peanut butter cake is perfect cake for all occasions, including birthdays, weddings, graduations, holidays, parties or really any time that you want to make a cake!
Super moist vegan chocolate peanut butter cake made with layers of tender and rich vegan chocolate cake between irresistible peanut butter buttercream frosting. No one will know this cake is vegan and dairy free!
Rich and moist vegan chocolate cake between inches of creamy and sweet creamy peanut butter frosting that's naturally vegan and dairy free and chocolate ganache on top!!! It's truly one of the vegan cake recipes that you will keep going back to!
Oh and decorated with vegan peanut butter cups, because if you are already this far, you might as well go all out.


Ingredients:

For the vegan chocolate cake:
  • 550g self raising flour
  • 125g cocoa powder
  • 450g light brown sugar
  • 600ml plant-based milk
  • 2 tsp vanilla extract
  • 265ml sunflower oil
  • 1½ tbsp white wine vinegar
  • 6-7 peanut butter cups for decoration
For the Peanut Butter Buttercream:
  • 112g vegan butter, room temperature
  • 85g smooth peanut butter
  • 360g icing sugar
  • 1 tsp vanilla extract
  • 1-3 tbsp soy milk or any non-dairy milk **
For Chocolate Ganache:
  • ½ cup chocolate chips
  • ¼ cup vegan double cream
Method:

For the cakePreheat oven to 180ºC/160ºC for fan assist oven. Line and grease 3x 8 inch (20cm) cake tins with baking paper on the bottoms.

In a large bowl, add the self raising flour, sugar and cocoa powder. Whisk them together so that they are evenly distributed.

Pour in the milk, vanilla extract, oil and white wine vinegar. Mix the mixture until smooth-try not to over-mix however. I just use a spatula.

Split evenly between the three tins, and bake for 30-35 minutes.

Once baked, leave it to cool in the tins for 10 minutes, and then remove onto a wire rack to cool completely. Be careful when handling the sponges as they will be very soft and could break easily.

Once the cake has cool completely, refrigerate the cakes for 1-2 hours before decorating to make them easier to handle

For the Peanut Butter Buttercream: Add vegan butter, peanut butter, icing sugar, vanilla extract and soy milk to the bowl of a stand mixer.

Starting at slow speed, gradually increase speed until your frosting is thick and smooth. Set aside.

For Chocolate Ganache: Heat cream in the microwave. Pour over the chocolate. Wait for 5 minutes then stir until smooth. Wait until the ganache to cool so it isn't as runny.

To assemble the cake: Place one cake layer onto a cake plate or stand, and add about ½ of the frosting to the top of the cake layer. Use a flat cake knife to smear the frosting until it meets the edges. Place the second layer on top and repeat. Place the third layer on top, and smooth any frosting that is poking out between the layers (almost like creating a crumb coating). Place the cake in the fridge for 30 minutes. 
After the initial crumb coat is set, apply the final layer of frosting. Put in the fridge for 30 minutes for the frosting to set.

Once the frosting is set, pour the cool ganache over the middle of the top cake, and around the edges, letting it make decorative drips down the sides of the cake. Chill the cake in the fridge for another 30 minutes before adding the rest of the decorative frosting.

Use a decorative frosting tip to pipe swirls around the edges of the cake. Chop the peanut butter cups into half or quarters and top it in the centre of the cake. 

Slice & Enjoy!!!

Notes: ** the amount of soy milk use may be more or less depending on how soft your vegan butter is. If you use a very firm block style vegan butter you may need 2-3 tablespoons of non-dairy milk and if you use a soft tub-style vegan butter you may only need 1 tablespoon.


Monday, 4 December 2023

Pizza Birthday Cake


Pizza or Cake?

This theme cake is definitely a hit with a pizza love. Make your pizza cake even more realistic with  your favourite pizza toppings. 

Ingredients:
Base:
  • 100g golden castor sugar
  • 100g softened butter
  • 2 eggs
  • 100g self raising flour
  • pinch of baking powder and salt
  • ½ tsp vanilla extract
Decorations:
  • 250g of dough coloured sugar paste, use yellow and brown food colouring gel
  • apricot jam or golden syrup
  • 200g buttercream
  • some red gel food colouring
  • 3-4 tbsp raspberry or strawberry jam
  • 70g-100g of light yellow sugar paste, keep in the freezer to harden
  • basil leaves, optional
Pepperoni topping:
  • 50g ready roll Teddy Bear Brown sugar paste
  • some red gel food colouring
  • 25-40g white sugar paste
Method:

Preheat the oven to 180ºC/160ºC for fan assist oven. Grease and line a 10 inch cake tin with baking paper.

In a mixing bowl, cream together the butter and golden castor sugar until light and fluffy. Beat in the eggs one at a time, followed by the vanilla extract.

Sift in the self raising flour, baking powder and salt. Gently fold until just combined. Do not overmix.

Pour the batter into the prepared cake tin and smooth out the surface with a spatula. However do not smooth  all the way of the cake tin. Leave about ½ inch. This is to make the pizza cake looks more realistic. Bake for 15-18 minutes or until a skewer inserted into the centre of the cake comes out clean.

While the cake is baking, prepare the decorations. 

For the pepperoni, roll out the teddy bear brown sugar paste and add some red gel colouring (bit by bit) until you achieve the right colour of the pepperoni. Once you are happy with the colour, roll out into sausage and cut into half. Lightly flatten each sausage. Then take the white and roll it out and cut the same length as the red. Put on top each of the white on top the red and stack it up on top of each other. Add a bit of white on the sides. Roll it out and cut into half again. Stack it up on top of each other. Repeat this process for about 4-5 times until you have the marbley effect.  Slice the sausage and roll it out as thin as possible, cut out circles, then edges were curled using a ball tool. The circles were to let dry. Before topping the cake with the pepperoni, lightly brush a thin layer of vegetable oil to get the shine.

Next step is to roll out dough-coloured sugar paste into a sausage shape and flatten it using your fingertips. Stick it to the edges of the cake with a little apricot jam or golden syrup.

Lightly add some black colouring around the pizza to make the charred effect. Use a blowtorch to scorch the sugar paste or cover the centre of the cake with foil and then grill.

For the "tomato paste", add the red gel to the buttercream and mix in the strawberry or raspberry jam. Mix well. Spread the mixture over the centre of the cake.


Take the frozen light yellow sugar paste from the freezer. Using a grater, grate the "cheese" over the tomato paste. 


When you are happy with the amount of cheese on top of the pizza, finally top up the pizza with the pepperoni. Top with fresh basil leaves to dress the cake and to add the finishing touched. 


Notes: to resemble mozzarella, loosen some uncoloured buttercream with water until dropping consistency. Then use two teaspoons to drop the buttercream onto the cake in small blobs. Smooth with a spoon to create the desired effect.
For olives, slice liquorice and use a small metal piping nozzle to cut out the centre to look like pitted olives.

Monday, 13 November 2023

Chocolate Mousse Cake


This delicious non-bake Chocolate Mousse Cake  made using 5 ingredients. This easy chocolate mousse cake has a crunchy Oreo crust and is topped with whipped and fresh raspberries.

Make no mistake, this Chocolate Mousse Cake is not for the faint-hearted. It's oh-so-chocolately. Serve a slice with whipped cream and fresh strawberries for the ultimate no bake dessert. Since you need to give it time to set in the fridge, it is best to make it the night before.

Ingredients:
  • 200g Oreo cookies
  • 60g butter, melted
  • 200g dark chocolate, broken into pieces
  • 200g milk chocolate, broken into pieces
  • 600ml double cream
  • fresh raspberries, for decoration
Method:

Lightly grease a 9 inch springform baking pan with a some butter and set aside.

Add Oreo cookies to a food processor and blend until they resemble fine crumbs. Pour the melted butter over the crushed Oreos and whiz again the mixture resembles wet sand.

Pour Oreo mixture into your prepared tin and press down gently to form an even layer. Pop in the fridge.

Place chocolate in a large heatproof bowl and melt in the microwave, stirring every 30 seconds, until smooth and creamy. Leave for a few minutes to cool slightly.

Meanwhile, use an electric mixer to beat the cream until stiff peaks from. Gently fold cream into melted chocolate until smooth and combined. Pour over cookie crust. Place in the refrigerator to set for at least 4-6 hours or even better, overnight.

To serve, decorate with extra whipped cream and fresh raspberries.

Serve cold.

Friday, 11 August 2023

"Boobs" 50th Birthday Cake


Best boobie cake ever !! 50th birthday cake for which make from chocolate cake. The chocolate cake recipes is on my previous post but I attached again the link for easy access. 


 To get the boob shape, I used the hemisphere cake tin from Wilton

Once the cake is cool down and ready to decorate, place the "boop" on a cake board. You can cover the boops with any colour of bikini you wish and decorate decorate the bikini as you like.

Sunday, 23 July 2023

Chocolate Mousse Cake


I like chocolate mousse anything-Chocolate Mousse, French Silk Brownie and Chocolate Mousse Brownie are just a few of the chocolate mousse treats that I love! So it isn't surprising that this chocolate mousse cake is one of my favourite cake recipes!
This cake is intensely chocolaty. It is topped with super rich and creamy chocolate mousse for the ultimate chocolate dessert.
And all of that chocolate in one little piece of cake means a super delicious dessert that is perfect for birthdays, holidays and any time you want something a little extra!! Chocolate mousse is simple divinity in its own right, but when paired with chocolate cake, it is downright decadent.


For the Chocolate cake ingredients:
  • 175g self raising flour
  • 21/2 tbsp cocoa powder
  • 1 tsp bicarbonate soda
  • 2 eggs
  • 130g castor sugar
  • 150ml milk
  • 150ml corn oil
  • 2 tsp vanilla extract
  • 125g dark chocolate (70% cocoa solid)
  • 397g can Carnation caramel
  • 1 tbsp icing sugar
For the Chocolate Mousse ingredients:
  • ½ cup hot water
  • 25g cocoa powder
  • 115g semi sweet chocolate, finely chopped
  • 480ml double cream
  • 15g icing sugar
  • ½ tsp vanilla extract
Method:

For the chocolate cake : Preheat oven to 180C/160C for fan oven.

Base line 2x8" sandwich tins with baking parchment

Sift the flour, cocoa powder and bicarbonate soda into a bowl and stir in the sugar.

In a jug, measure the oil and milk, then add the eggs, one tsp vanilla extract and mix together with a fork until combined. Beat 2 tbsp of caramel until smooth and whisk into the egg and oil mixture.

Combine the wet with the dry ingredients and mix well. The cake mix will be quiet wet. Pour the mixture into the tins and bake in the centre of the oven for 20 minutes until springy to the touch.

Cool the cake in the tins for 5 minutes and then turn out onto a wire rack. Remove the baking paper and cool completely.

For the chocolate mousse: As the cake cools, prepare the chocolate mousse so it can chill and be ready at the same time as the cake layers. You can also prepare the mousse 1-2 days ahead of time.

Whisk the hot water and cocoa powder together. Set aside. 

Melt the chopped chocolate in a double boiler or use microwave. If using the microwave, place the chopped chocolate in a medium heat-proof bowl. Melt in 20 seconds increments in the microwave, stirring after each increment until completely melted and smooth. 

Pour hot water/cocoa mixture into melted chocolate and stir until thick and smooth. Set aside.

Using a hand mixer or stand mixer fitted with a whisk attachment, whip the double cream, icing sugar and vanilla extract together on medium-high speed until medium peaks form, about 3-4 minutes. 

Pour in the chocolate mixture and using a spoon or rubber spatula, gently fold together. Avoid over-mixing which can deflated out the mousse. Cover mousse and chill in the refrigerator for at least hours and up to 2 days.

Assemble the cake: First, level the cakes if needed, using a large serrated knife, slice a thin layer off the tops of the cake to create a flat surface.

Place 1st cake layer on your cake stand or serving plate. Using a large icing spatula, evenly cover the top with about 1½ cup of chocolate mousse. Top with 2nd layer. Spread a thin crumb coat over the top and the sides of the cake. Sit in the refrigerator to set for 30 minutes. Finally spread the remaining mousse over the top and around the sides. Use a bench scrapper to smooth out the cake. Or you may also makes some swirling pattern on the sides and the top as you wish.


Monday, 1 May 2023

Vegan Chocolate Orange Mousse Cake


Orange and chocolate is just one of those delicious combos! Not forgetting this is also vegan !
Silky, creamy chocolate orange mousse sandwiched between two moist and spongey layers of vegan chocolate orange cake. This showstopper cake is guaranteed to please vegans and non-vegans a like!


Ingredients:

Cake ingredients:
  • 280g plain flour 
  • 280g granulated sugar
  • 35g cocoa powder
  • 1½ tsp baking soda
  • ½ tsp salt
  • 200ml soya milk, warm
  • 100ml orange juice
  • 1½ tbsp apple cider vinegar
  • 120g vegetable oil
  • 1 tsp vanilla extract
  • 2 tbsp orange extract
  • 1 tsp orange zest
Mousse ingredients:
  • 400g silken tofu
  • 400g dark chocolate, chopped
  • 150ml orange juice
  • 1 tbsp maple syrup/golden syrup
  • 2 tbsp orange extract
  • 1 tsp orange zest
Chocolate Ganache layer:
  • 100g cocolate
  • 100g soya milk
Method:

For the cake: Preheat the oven to 180ºC/160ºC for fan assist oven.  Line 2 x 8" sandwich tin or an 8" cake tin with baking paper.
Sieve together all the dry ingredients into a large mixing bowl. Set aside. 

Warm up the soy milk, 60 second in the microwave should be warm enough. Add the apple cider vinegar to the milk to make a "buttermilk". Leave to curdle for 10-15 minutes.

Add the remaining wet ingredients including the orange zest to the  buttermilk. Create a well in the dry ingredients and pour the wet ingredients in. Whisk together until fully incorporated. Be careful not to overmix.

Pour the cake batter into the cake tin. If you are using 2 sandwich pans, distribute the batter equally into the 2 pans. Bake for 30-35 minutes for the 2 sandwich pans or 40-45 minutes for the single pan. Use a skewer to test the cake, if it comes out clean it is ready. Take out of the oven and leave to cool completely.

Once cooled, take the cake out from the tin and using a wire cutter or serrated knife, cut the single cake into two even layers. If you are using 2 sandwich pans, no cutting is needed. Cut the top dome of the cake to level them out.
 
Leave one layer in the base of the cake tin, ready for the mousse to be poured on top.

For the mousse: In a food processor, add all the ingredients except for the chocolate. Blitz until smooth. You can also use a hand whisk if you not have a food processor.

Melt the chocolate using a bain-marie or in the microwave using 30 seconds bursts. Pour the melted chocolate into the food processor and blitz until it is fully incorporated.

Pour the mousse onto the bottom cake layer in the tin. Place the cake tin in the fridge for 1-2 hours to set or put into the freezer for 20 minutes to speed up the process.

Place the top cake layer on to the mousse and leave the whole cake to set in the fridge for at least 1 hour.

For the ganache: Meanwhile, heat up the soy milk in a saucepan on low heat. When it starts to simmer, pour it onto the 100g chocolate and set aside for 5 minutes to melt.

Carefully take the cake out of the loose bottom cake tin and pour  the ganache layer on top of the cake.
You can decorate the cake as you can see from my pictures, I used fresh strawberries. 

Cut and serve!!!


Sunday, 30 April 2023

Chocolate Mousse Cake


This chocolate mousse cake makes the perfect light dessert. It is made with a rich chocolate cake base, cool creamy mousse filling and topped with rich chocolate ganache.
This cake has loads of chocolate from top to bottom. The cool, rich texture makes it great for any special occasion or holiday.
Rich and velvety Chocolate Mousse Cake is an impressive yet oh-so-easy cake recipe that is sure to wow at the dessert table!

Ingredients:

For the cake: 
  • 145g granulated sugar
  • 60ml vegetable oil
  • 2 large eggs, at room temperature
  • 2 tsp vanilla extract
  • 48g sour cream, at room temperature
  • 140g plain flour
  • 20g cocoa powder, sifted
  • 1¼ tsp baking powder
  • ¼ bicarbonate soda
  • ½ tsp salt
  • 157ml hot brewed coffee
For the chocolate mousse layer:
  • 1 tbsp cold water
  • 1 tsp gelatine powder
  • 1 cup + 2 tbsp double cream, divided
  • 115g dark chocolate, roughly chopped
  • 65g icing sugar
  • 225g cream cheese, at room temperature
  • 50g granulated sugar
  • 2 tsp cocoa powder
  • 1 tsp vanilla extract
For the ganache:
  • 75g dark chocolate
  • 90ml double cream
For the whipped topping:
  • 1 cup double cream
  • 65g icing sugar
  • 2 tbsp cocoa powder
  • 1 tsp vanilla extract
Method:

For the cake: Preheat the oven to 175ºC/160ºC for fan assist oven.  Line an 8"/20cm cake tin with baking paper.

In a large mixing bowl, combine the sugar, vegetable oil, eggs and vanilla extract. Beat on medium speed until the eggs and oil are well combined and the batter is lighter in colour. Next mix in the sour cream and beat until well combined.

In a separate bowl, sift together the dry ingredients. Add half the dry ingredients to the wet ingredients, followed by half of the coffee, and mix until the flour is just incorporated at a low speed. You can also use a hand whisk to do this. Then add the remaining dry ingredients and coffee. Beat until all of the ingredients are well combined.

Use a spatula to scrape down the sides of the bowl and stir the batter from the bottom to the top to ensure it is well mixed.

Bake for 30 minutes or until the skewer inserted comes out clean. Cool completely.

For the mousse layer: Place 1 tablespoon of cold water in a small dosh. Sprinkle the gelatine powder over the cold water. Allow the gelatine to bloom, about 3-5 minutes.

In a microwave-safe bowl, combine the chocolate and 2 tablespoons of the double cream. Microwave in 30 second increments, stirring each time until the chocolate is melted.

Next, melt the gelatine in the microwave for about 5 seconds until it turns back liquid. Watch it closely. Remove any lumps that did not melt. Stir the liquid gelatine into the melted chocolate and set it aside to cool.

Prepare the whipping cream. Using the clean bowl, beat the double cream on high speed until it is thickened to soft peaks. Next, add the icing sugar and continue beating at high speed until stiff peaks form. Set the whipped cream aside.

Beat the cream cheese until it is completely smooth. and free of lumps. Scrape down the sides of the bowl, add the granulated sugar, cocoa powder and vanilla extract, and beat until well combined.

Next, add the melted chocolate, beating until it is completely mixed into the cream cheese, scraping down the bowl as needed. Lastly, fold in the prepared whipped cream and mix until all the ingredients are combined.

To assemble: Transfer the cake layer to an 8 inch spring form pan, or line the cake tin with baking paper along the bottom and up the sides if you want to remove the cake from the pan. Place the cake in the bottom of the pan. Pour the chocolate filling over the chocolate cake, spread evenly and refrigerate until the filling is set, 2-4 hours.

For the chocolate ganache: In a microwave-safe bowl, combine the chocolate and the double cream. Melt the chocolate in the microwave in 30 second increments and stir until completely combined. Allow to cool.

Pour the chocolate over the mousse layer and spread evenly. Allow the ganache to set a little bit before adding the topping.

For the topping: Prepare a second batch of whipping cream following the same instructions as above, adding cocoa powder together with the icing sugar and vanilla. Pipe the border using a large open star tip. 


Friday, 28 April 2023

Biscoff Drip Cake


The Biscoff  Drip Cake is the ultimate Biscoff showstopper!!! It is made up of three layers of brown sugar and Biscoff cake, filled and covered with Biscoff buttercream, and decorated with a Biscoff spread drip and Biscoff biscuits. It is basically Biscoff heaven!!! 
It would be such a perfect cake for a Biscoff  fan's birthday - or any other celebration.
Depending on where you live, Biscoff might not actually be called Biscoff. It may be known as Speculoos or Cookie Butter. No matter what you call it you cannot deny that it is utterly delicious!


This Biscoff Drip Cake is three layers of utterly incredible toffee sponge. In the cake I used light brown sugar instead of caster sugar. This is completely optional and you can use caster sugar if you prefer. The reason I used light brown sugar is because it gives the cake a delicious toffee flavour, which is incredible but it also goes well with the Biscoff spread.


Ingredients:

For the cake:
  • 400g unsalted butter
  • 400g light brown sugar
  • 400g self raising flour
  • 8 medium eggs
  • 2 tsp baking powder
For the buttercream:
  • 250g unsalted butter
  • 500g icing sugar, sifted
  • 300g Biscoff spread
For the sugar syrup:
  • ¼ cup of sugar
  • ¼ cup of water
For the drip:
  • 140g Biscoff spread smooth
For decoration:
  • 16 Biscoff biscuits
Method:

For the cake: Preheat the oven to 180ºC/160ºC for fan assist oven. Grease three 20cm/8" cake tins with butter and line the base with baking paper.
Add the butter and sugar in a mixing bowl and beat until fluffy and light. You can use a hand mixer or stand mixer for this.
Add in the flour, eggs and baking powder and beat until all the ingredients are well mix, a lovely smooth cake mixture is formed.
Split evenly between the three tins and bake in the oven for 30-35 minutes ( or until the skewer comes out clean).
Once baked, leave the cake to cool in the tin for 10 minutes, and then remove from tin and leave to cool fully on a wire rack.

For the buttercream: Beat the butter with a hand mixer or stand mixer until it is smooth and supple.
Add in the icing sugar, a little at a time and beat fully until it is light and fluffy. Add in the Biscoff spread and beat until combined. If it is really stiff, add in 1-3 tbsp of water or milk mixing fully each time.

For the syrup: In a small sauce pan boil the water and the sugar until fully dissolve on a low heat. Continue to stir for 3-4 minutes. Let the syrup cool completely in the saucepan.

To assemble the cake:

If the cakes have domed on top, level them off with a cake leveller or a serrated knife.

Spread a smidge of buttercream on the cake board. This is to prevent the cake from sliding off the board when decorating. 

Place the cake board on a decorating turn table and add your first cake to the cake board. Spread over some of the buttercream.

Add the second cake and repeat the same. 

Add on the third cake. Spread some of the butter cream on top and around the edges till the sides are smooth and you have created a crumb coat. It doesn't need to be thick, it just needs to refill any gaps or holes that may be on the sides.

Refrigerate the cake for 15 minutes to set the crumb coat.

Once set, coat the cake with second and thicker layer of buttercream and smooth it out as best you can using buttercream scraper or smoothing tool. Then put it back in the fridge for 30 minutes to set and firm up.

Melt the Biscoff for the drip in the microwave for 20 seconds, or until it is a pourable consistency. Put it in a piping bag, squeezy bottle or if you are confidence you can use a spoon.

Pipe the Biscoff around the edge of the cake, allowing it to drip down the sides in varying amounts.

Once the drips are completed, cover the whole top of the cake with the remaining Biscoff spread. Use a palette knife to smooth it out. Put the cake in the fridge for 30 minutes for the Biscoff to firm up.

Put the remaining buttercream into a piping bag with your chosen nozzle and pipe swirls all around the edge of the cake.

Decorate with Biscoff biscuits, the biscuits will go softer after being in contact with the buttercream so do this as close to serving the cake as you can.